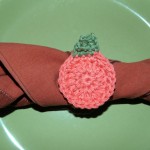
For this Thanksgiving napkin ring, I used a size 3 crochet thread with an F hook for the actual ring portion and used Sugar ‘n Cream size 4 cotton yarn with a G hook for the actual pumpkin design and stem. By doing this, it made the pumpkin the focal point. It also gave me a rustic looking design.
For the ring portion directions, refer to the HDC napkin ring design that I posted earlier making sure you leave yourself about a 10″ yarn tail to use to attach your pumpkin design. Here are the directions for the pumpkin and stem:
CH, SC and DC stitches are used. Begin by doing the “magic loop” with 8 SC within the circle, join with a SL stitch to beginning SC.
Round 2: CH 2, then complete 2 DC within each SC, join with SL in top of 2nd CH. You now have 16 DC stitches.
Round 3: CH 1, complete 1 SC in first DC stitch, complete 2 SC in next DC stitch, complete 1 SC in next DC stitch, complete 2 SC in next DC stitch, continue this pattern around and SL into top of beginning CH 1 stitch. You should have 24 stitches. Change colors.
Round 4: CH 1, complete 4 SC in next 4 stitches, CH 1 turn.
Round 5: Complete 1 SC, do 1 SC decrease, complete 1 SC, CH 1 turn.
Round 6: Complete 1 SC decrease, complete 1 SC. Fasten off.
Weave in your ends and prepare to attach your pumpkin to your napkin ring. Thread the tail that you left on the napkin ring and using your darning needle, sew the pumpkin design onto the napkin ring.
IMPORTANT: Keep in mind your placement direction of the pumpkin, do you want it to face horizontally with the napkin as in my picture or do you want the napkin ring to lay vertically.
These little pumpkins make up quickly and really add a personal touch to your dinner table. Enjoy!!
HAPPY CREATING!!
TIP: Feel free to use a finished design for your own personal use or make them to sell. However, I asked that you not sell my patterns but would greatly appreciate it if you sell a completed design to give recognition by referencing this blog site. Thank you!!
Leave a comment
