Archives

Changing Yarn Colors within your project

Anyways, it really, really doesn’t have to be such an ordeal no matter what process you use when it comes to changing your yarn colors.  For me, this is the best way to change yarn colors and takes all those stressful thoughts and throws them away.

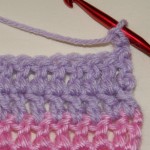
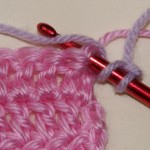
All I simply do is when I come to the end of the row of where the new color is to be added, I fasten off.  For me, it gives me the satisfaction of knowing that my crochet stitches will not come unraveled.  Now turn your work to get ready for the next row and the new color.  Make a slip knot onto your crochet hook using your new color, insert your hook  into the first stitch of the next row and make a single crochet (sc) stitch and continue with your pattern.

IMPORTANT NOTE:   If you are working half double crochets (hdc),  double crochets (dc) or treble crochets (tr), you must begin your new row adding the new color with one of these stitches to give you the correct height needed to continue your pattern.  Therefore, you will make your slip knot onto your hook, yarn over once for (hdc) and (dc) and yarn over twice if continuing with a (tr) —  now insert your hook into the first stitch of new row with the correct number of yarn overs and proceed to make your appropriate stitch according to your pattern.

If making a stitch that requires you to add a yarn over loop to your hook when changing colors, keep your right index finger placed securely onto the yarn over loops to hold them close to the hook, now insert your hook into the first stitch, yarn over and when you begin to pull that loop through the stitch use your thumb and index fingers of your left hand to help securely hold the loops on your hook as you begin to pull your stitches through the required number of loops to make the designated stitch.

Now you have a completed stitch and you can finish working your crochet piece according to your directions and resume holding your work as always.

Fastened off with first color

Turned crochet work, inserting hook into first stitch with new color


Completed couple of rows with new color

  •  TIP:  I like to take my yarn ends when possible and crochet them into my rows.  I just lay the yarn ends along the top edge of the row I am currently working along and hold in place while I crochet the necessary stitches for my pattern.  Trim away any yarn pieces that don’t get woven into the stitches.  Time saving technique and you never see them in the finished work.

HAPPY CREATING!!

Disclaimer:  This post contains affiliate links – “small commission earned”


Blocking your Crochet Piece

I am always debating whether to block my finished crochet piece??  For me, it all depends upon the type of yarn I have used and what my completed project is — a doily or clothing or afghan.

It is very important to always read what the manufacturer of the yarn recommends when it comes to washing and/or dry cleaning suggestions.  If using a cotton yarn/thread, I like to hand wash my completed project and lay if flat to dry.  When it is almost dry but still slightly damp, I will place it onto my ironing board, cover it with a towel and then use the steam feature on my iron.  Holding the iron very close to the towel without actually placing the iron on the item.  This will give you a smooth finished look without stretching the yarn and eliminate any curling that might have occurred.

One concern with cotton yarn that I always seem to dwell upon is the question of shrinkage.  I haven’t experienced any problems with shrinkage as long as I use cold water and air dry.  Then block the piece as mentioned above.

When using a wool blend yarn, again follow the manufacturer’s washing/dry cleaning directions, and then, if needed, you can block the piece the same way as described above.   A lot of times, however, when I have completed a project,  I will lay it out flat on a padded surface, spray it lightly with water, and just pat it into shape and let air dry.

I find too that if I am crocheting a sweater, it is a little easier to block or shape your pieces as you crochet them.  Again, laying them out on a padded surface, spray lightly with water and just pat them into their shape and air dry.  Then everything is ready to be joined according to your pattern directions.

You will find there are those projects that really need to be a certain size when completed, i.e., socks, mittens, hats,  some sweaters, and blocking your piece helps you to shape your work to those measurements.   Most importantly, your crocheting GAUGE must be accurate too for the completed project to be the size you need.    Blocking tools are available that you can put your damp project over to assist you in this shaping process.

My daughter and I are presently experimenting with blocking a rather large afghan that seems to curl on the edges.  We are laying it out flat onto a carpeted area that we have laid several towels down first.  Then we will be spritzing it with water, covering it with more large towels and then running a floor steamer over the top of everything.  Again, not touching the project with the steamer itself, just shooting the steam through everything.  Then we will  take the top towels off, pat into shape and let air dry.   We feel confident that this will work and will be much easier to shape since the afghan is a comforter size.

Always trying to keep those “creative juices” flowing!!

HAPPY CREATING!!

Disclaimer:  This post contains affiliate links – “small commission earned”

Preparing Crochet Edges

Depending upon my project, here’s a little crochet tip that I like to do which helps to prepare my piece for seaming or joining.

I like to finish off my crochet piece by bordering it with one row of single crochet stitches around the entire square or garment.  I even like to do this when not joining because it gives a nice, clean, professional look to your piece.

Basically, when you get to the end of your pattern, don’t fasten off, just continue around making a single crochet into every stitch within your project.  That border row of single crochet will be where you will place your joining stitches to form your seam.   Here are a few examples showing how to single crochet an edge.  Complete your single crochet on working edge, when you get to the corner,  complete three single crochet stitches in corner to keep edge from curling.  Continue with single crochet on next edge by inserting your needle along the edge stitches.  Keep them spaced fairly even so that your piece doesn’t curl and keep track of how many single crochet stitches you do so that you can do the same amount on the other side edge for a square, rectangle match the east/west sides with same number and the north/south sides with the same amount of stitches.  Next corner do your three single crochet and do one single crochet in each chain stitch so you have the same amount of single crochet stitches across the bottom edge as you do the top edge.  Continue with this pattern until you get back to the beginning corner of your top edge and fasten off.

Working sc along side edge

Showing how I insert hook along side edge


Showing 3 sc in corner stitch

How sc look along your finished piece

If making a garment, you might only want to single crochet along the places that need to be seamed; along sleeve and side seams.  Take into consideration the design and what works best for your particular pattern or design.


*TIP FOR JOINING:    Make sure that you use the same type of yarn as your project.  You can use a different color if you want contrast but if your project called for acrylic yarn, then use acrylic yarn for stitching seams or if you used merino wool yarn, then join using merino wool yarn, etc.  You get the picture.


HAPPY CREATING!!

Disclaimer:  This post contains affiliate links – “small commission earned”
The Mystery of Yarn Unraveled

Since I had a comment about yarn, I thought I would take a minute and briefly highlight some facts about crocheting/knitting yarns.  It is so much fun to go to a store and just look and, of course, touch the various skeins of yarn that are on the shelves.  There really is a little more thought needed when purchasing yarn especially for a pattern or project that you have in mind.

When you look at a skein of yarn, there should be a yarn symbol with a number in the center.  Those numbers actually tell you the diameter or weight of the yarn and then you will find a number telling you the yardage/grams/ounces which is how much yarn is in that particular skein.  So you pick up a skein of that luscious purple that you think will make a wonderful scarf and you read that it is a number 4/100 yards.  So you are really purchasing a medium diameter or worsted weight yarn with 100 yards available for your use.   The Standard Weight Guidelines is a great website to check out for all the industry standards used on the labels of various yarns. https://www.craftyarncouncil.com/standards/yarn-weight-system

A simple review of yarn categories and weights is this:

(0) is a LACE weight perfect for shawls or extra find projects

(1) is SUPER FINE  fingering yarn mainly used for socks and/or baby items

(2) is FINE good for baby and sport yarn

(3) is LIGHT good as sport, light worsted for clothing

(4) is MEDIUM worsted weight for afghans and clothing

(5) BULKY for scarves, hats

(6) SUPER BULKY crafts, rugs

On the labels, you will find the company’s recommendations for what the yarn should be used for and what needle size to use.  When just starting out, I would stick with the pattern recommendations for both needle size and yarn diameter/weight to help you get the correct finished size.  Make sure you purchase enough skeins to complete your project using the yardage/gram information.

As you become more proficient, the needle size might be different based on how tight or loose your stitches are (which is called your gauge, a whole new blog) and you will find that you will either use a smaller size or larger size needle(s).   Also, it can be very creative and fun to take a pattern and use a different yarn than what is suggested, the results can be very interesting.  You just need to remember that when changing anything about a pattern, you will have to readjust your yardage amounts which means you will either need to buy more or less skeins of yarn.  Of course, having left overs is always a plus for those small items just needing to be made.

HAPPY CREATING!!

Disclaimer:  This post contains affiliate links – “small commission earned”