Tag Archive | crochet leaf tutorial

Crochet Pumpkin with Leaf Tutorial

I found this fantastic free pattern on Knit Picks by Hannah Maier, I believe it can be found also on Ravelry.  It is actually two patterns – one for knitting and one for crocheting.

SONY DSC

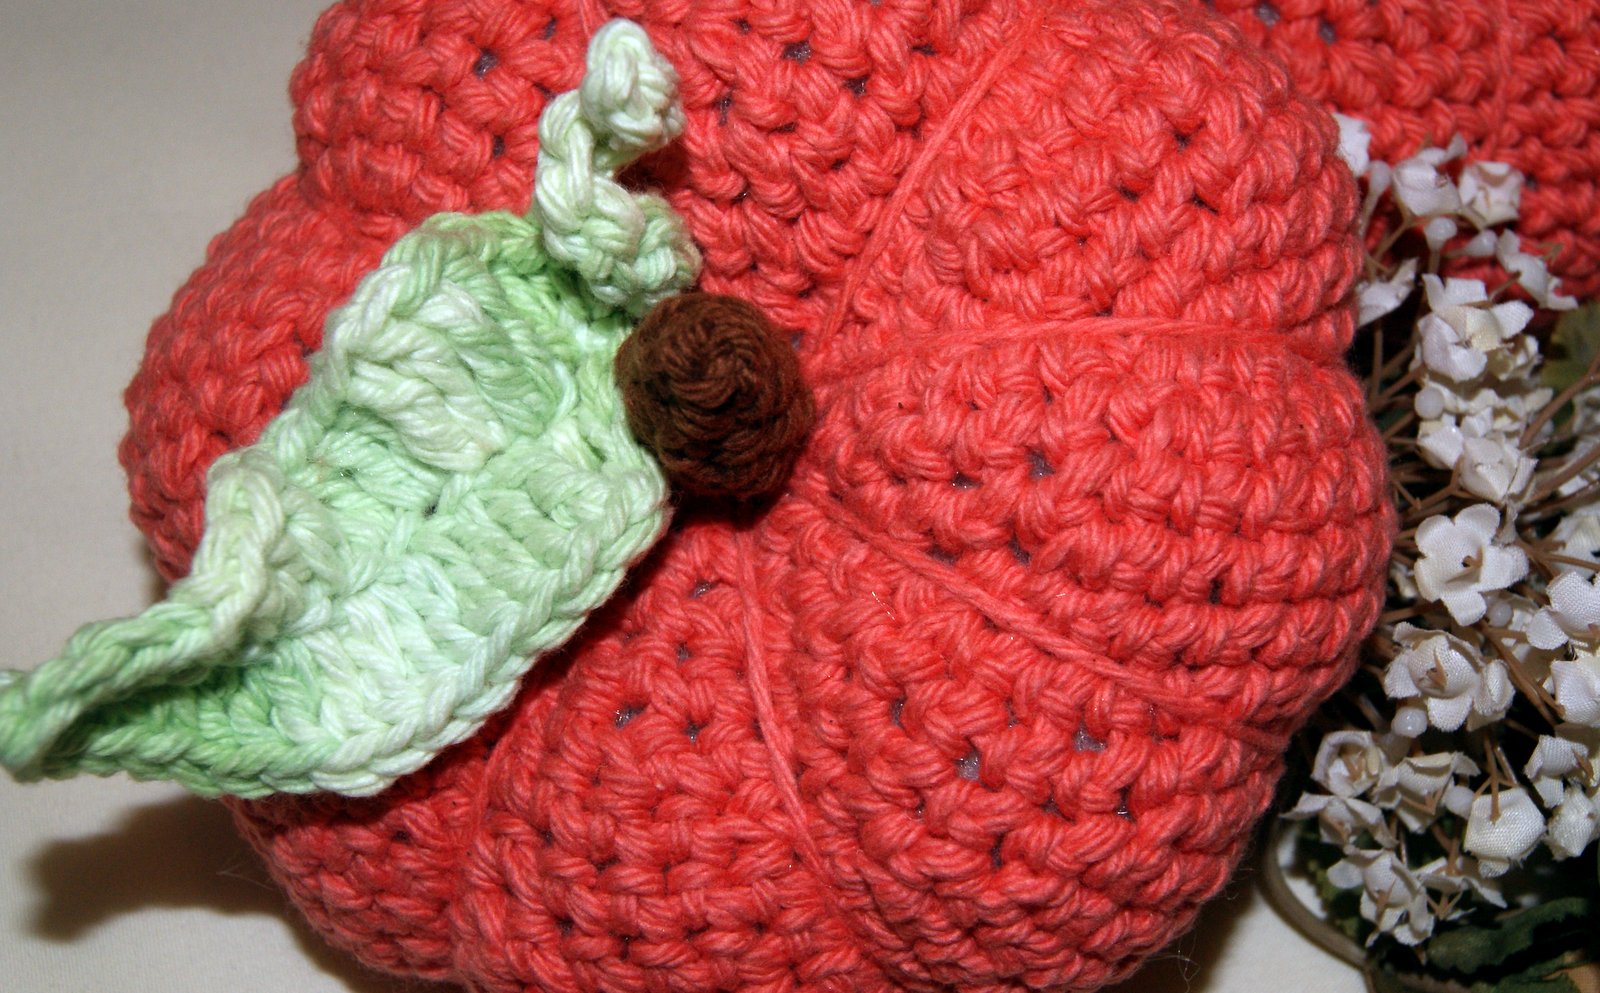
I created the crochet version, which was called the Clove Pumpkin.  The yarn that I chose was Lily, The Original Sugar ‘n Cream cotton.  I crocheted one using a Size H hook and the other one I used a Size E.  I didn’t vary from the directions given but wanted to add a leaf to my pumpkin as well as that little curly Q feature you sometimes see on a real pumpkin.  So I spent an evening designing this little leaf that I really like.

SONY DSC

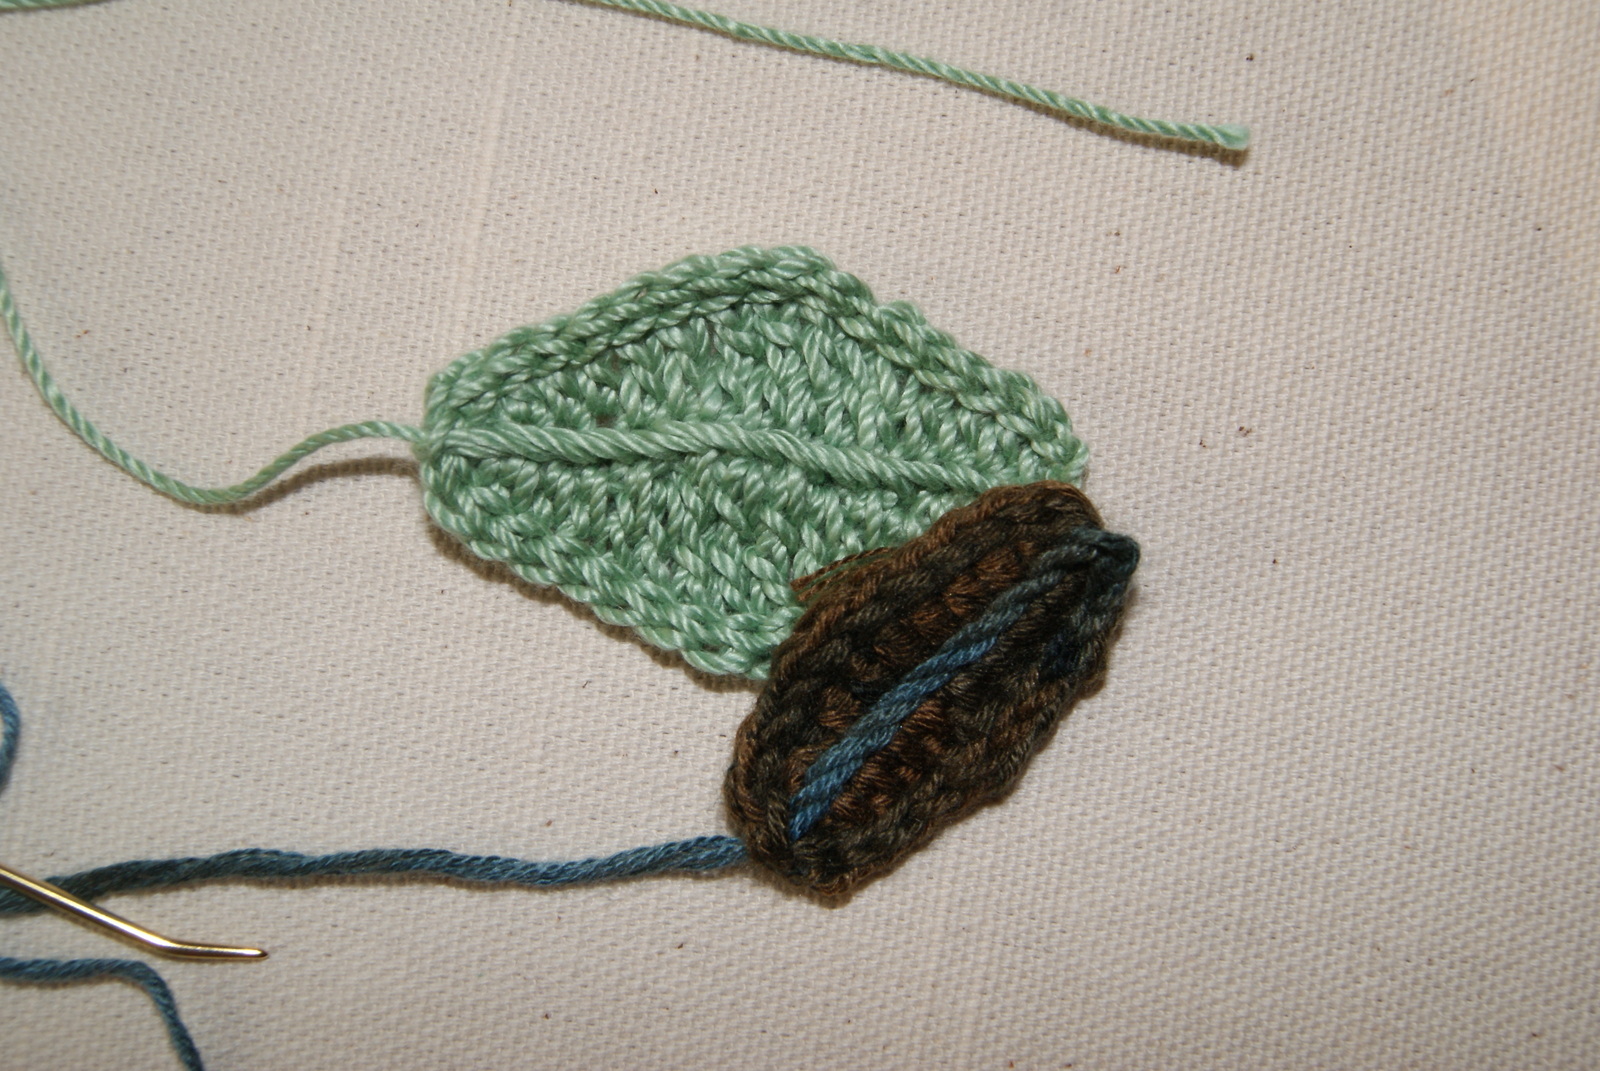
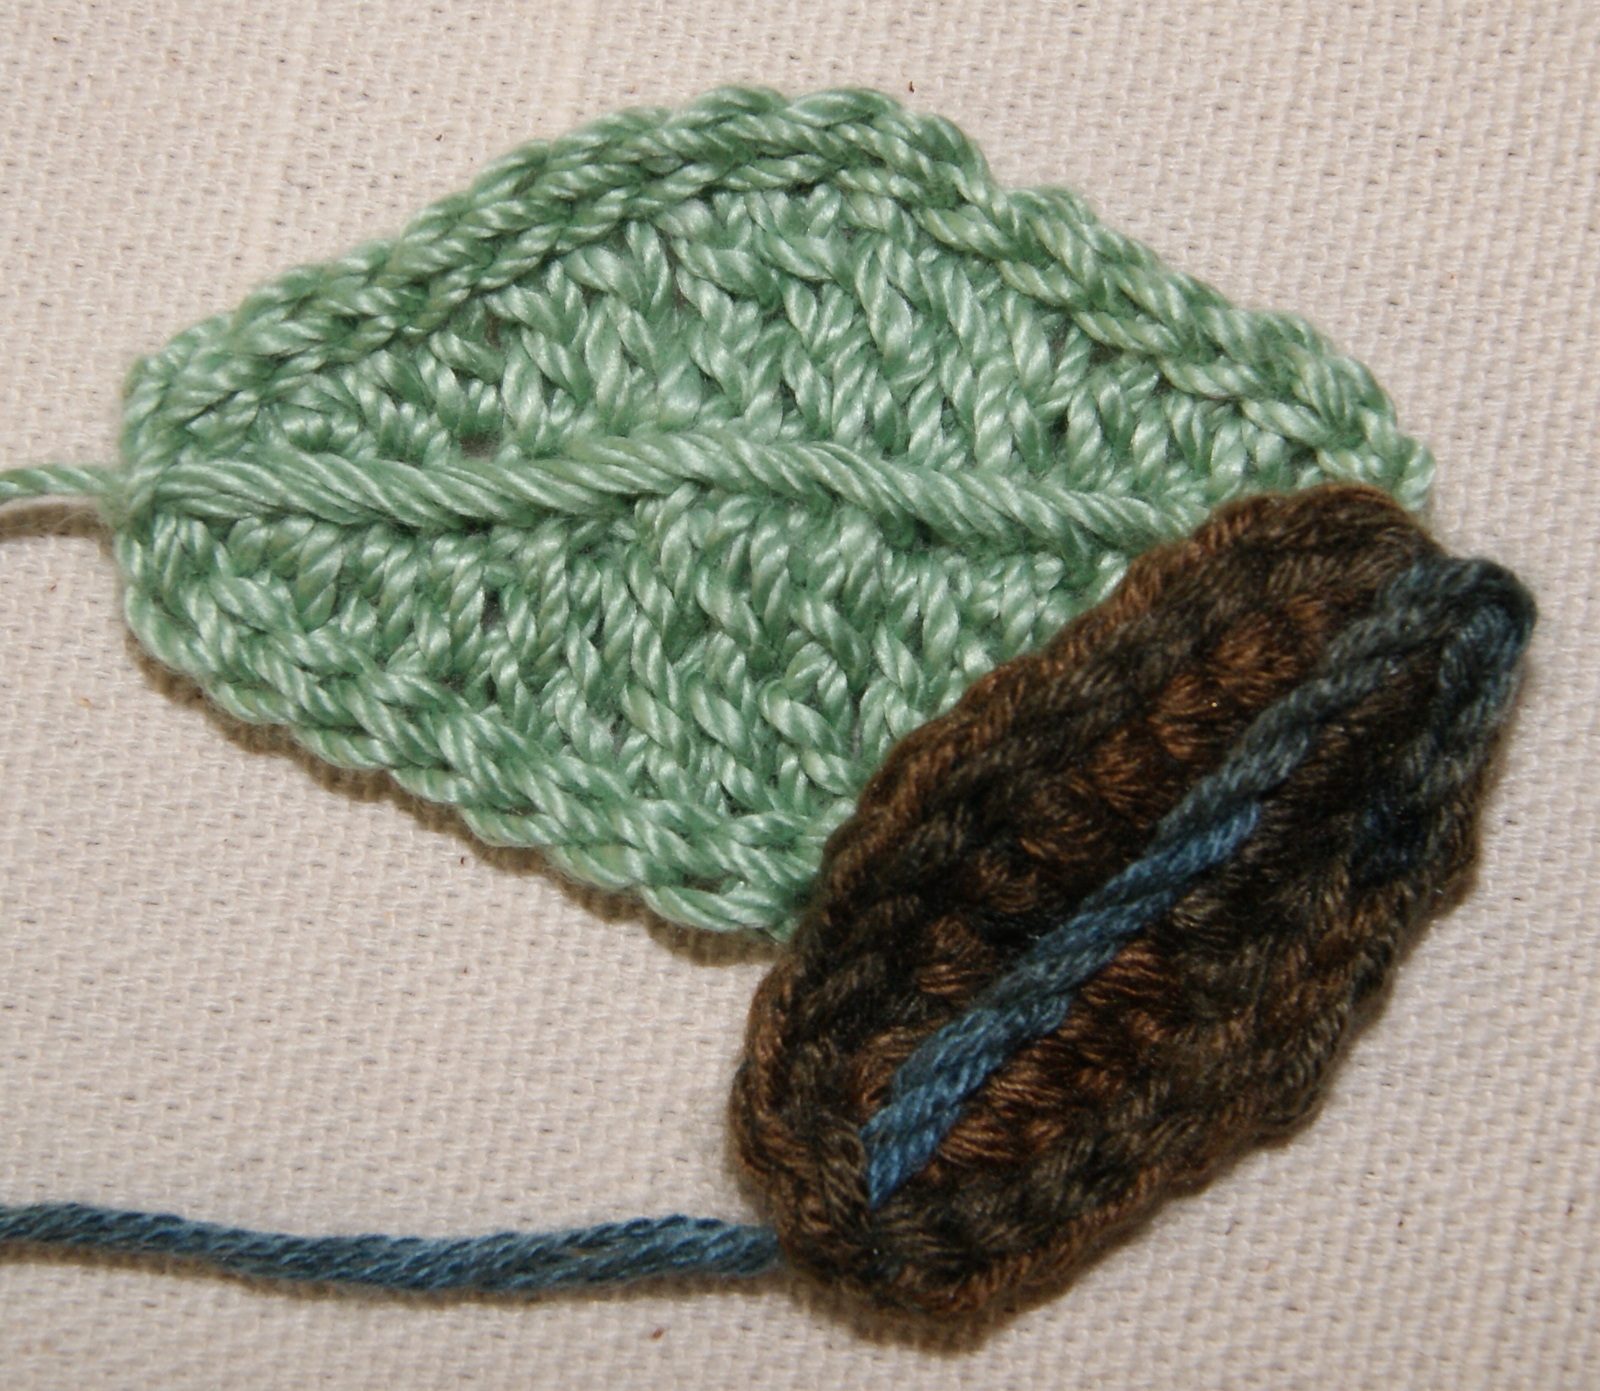
Here are the directions for the leaf:  I used the same yarn type as I did for the pumpkin and made my leaf with a Size H crochet hook.  In the smaller version, I used a Size E hook for my leaf.

Chain 22, skip first two chains then SL (slip stitch) in next 9 chains.  In next chain complete 1 HDC, 1 DC, 1 TRB, in next chain – 2 TRB, next chain – 2 TRB, next chain – 2 HTRB, next chain – 2 HTRB, next chain – 2 DC, next chain – 2 DC, next chain – 1 HDC, next chain – 1 HDC, next chain – 1 HDC, last chain – 3 SC.

Now you want to basically reverse that stitch pattern on the back side of the chain stitches.  1 HDC, 1 HDC,  1 HDC, 2 DC, 2 DC, 2 HTRB, 2 HTRB, 2 TRB, 2 TRB, last chain 1TRB, 1DC, and 1 HDC.  Viola, you end up with this really cute leaf.  I just stitched it to the center of the pumpkin along with the stem.  SONY DSC

Also, in my smaller version, I created 8 pumpkin ridges just for some variations.  I have been placing them around my house and will use some for a table centerpiece for Thanksgiving!!

Thank you Hannah Maier so much for sharing such a cute pumpkin pattern.  Love it 🙂

HAPPY CREATING!!

Disclaimer:  This post contains affiliate links – “small commission earned”

Free Pattern Crochet Leaves (Tutorial)

Autumn has arrived and the leaves will soon be falling which stirred my creative juices for crocheting leaves as appliques for my various projects.  I will let the “real” leaves turn to compost!!SONY DSC

Using a size F hook and size 3 crochet thread, a simple leaf can be yours in minutes.  Crochet 16 chains, complete 1 SC in 2nd CH from hook, in next three chains make 1 HDC, next 2 chains make 1 DC, next 3 chains make 1 TRB, next 2 chains make 1 DC, next three chains make 1 HDC, ending in last chain with 1 SC.  Chain 1, crochet 1 SC in same stitch. SONY DSC

Now crochet along back edge of beginning chains and complete the same pattern exactly opposite of what you just completed:   3 HDC, 2 DC, 3 TRB, 2 DC, 3 HDC, 1 SC.  Chain 1 and join with a SL into beginning SC.  Complete a SL stitch into every stitch around the entire leaf and fasten off.  Be sure to leave yourself about a 12″ tail of yarn when you go to fasten off.  SONY DSC

Now thread a darning needle onto your tail and begin making back stitches down the center of your leaf going from one end of leaf to the other end.  The size of your back-stitch is totally up to you.  I probably make about 1/4″ long back-stitch.

SONY DSCSONY DSC

I only crochet right-handed and do everything else left-handed so my example pictures for the back-stitch are for a left-handed person.  If you are right-handed, your stitches and needle will be facing the opposite direction of what I am showing.

SONY DSC

Once you have completed your back stitches, your leaf is ready to be appliqued to your project.  If your tail is long enough, you can use that thread to attach your leaf.

What I like about this pattern is that you have lots of variations for making smaller and/or larger leaves.  In my other example, I used a size C hook and variegated sock yarn.  I only crochet 11 chains with my pattern sequence of 1 SC in 2nd chain from hook, 3 HDC, 2 DC, 3 HDC, 1 SC, chain 1, 1 SC in same stitch, then along back edge directly opposite of each other 3 HDC, 2 DC, 3 HDC, 1 SC, chain 1, SL into beginning chain and then continue around entire leaf making a SL into each stitch.  Fasten off leaving about 12″ tail and make your back stitches down the center of your leaf.

SONY DSCSONY DSC


Just remember whatever stitches you create on your beginning chain, just repeat that pattern on the return side of the chain.  Have fun creating different leaves for your projects and remember, no raking is involved!!

SONY DSC

HAPPY CREATING!!

Disclaimer:  This post contains affiliate links – “small commission earned”

,