Archives

Working with a Multi-Sized Child’s Sewing Pattern

Today’s sewing patterns are very pricey and purchasing a pattern for a child with 3 sizes within one pattern (i.e., 4-5-6)  is a great idea.  However, if you need the smallest size and cut out along the recommended cutting lines then you have discarded the two larger sizes.  And what happens when you want to use that pattern again but now your child is the next size??

Something I like to do is to cut out the largest pattern size and then trace the two smaller sizes onto light weight UNFUSIBLE pellon/interfacing.   Just layout your pattern pieces on a firm surface and place the pellon on top.  You can see through the pellon to trace the other sizes and then cut them out to use when needed.  Most pattern pieces will have 3 separate size pieces for things like facings, so you won’t have to trace them.

Light weight pellon is not very expensive and is readily available at your local fabric store.  It will fold up nicely to go back into your pattern package and you can use your iron to press out any creases too.  I always keeps a couple of yards of unfusible pellon in my very large sewing stash (that’s another blog in itself)!!

Tracing your additional patterns onto pellon is great especially if you have several children you are sewing for or have a favorite pattern that you use over and over again.  The pellon holds up very well with extended use.

Give this a try, takes a little bit of extra time to trace out your pattern pieces but in the long run your budget with love it!!

HAPPY CREATING!!

Disclaimer:  This post contains affiliate links – “small commission earned”


Let’s Take a Nap??

Not really, let’s just briefly discuss sewing using a fabric that has a “nap”.  A fabric with nap is a type that usually has a “pile” which means that it has gone through a process to bring the fiber ends to the surface.  Good examples of a fabric with nap are:  Velvets, Corduroy, Terry Cloth, Brushed Denims, Suede, Flannel and Fur.

You can actually run your hand along the fabric and see a difference in shading and design with a napped fabric.  When reading a pattern, it will state the yardage  *with nap  and  **w/o nap.  Most of the time, depending upon the design of the pattern, you will always need more fabric to complete your project if you are using a fabric with a nap.

The reason for this is because YOU MUST LAYOUT your pattern pieces with them all RUNNING in the SAME DIRECTION.  If you don’t cut out all your pattern pieces in the same direction, your garment will not have a cohesive look to it and you will see unusual color/ shading differences.

Personally, when I am laying out pattern pieces using napped fabric, I like to have the direction of the nap heading South or brushing down from the top to the bottom.  You will see that if you rub your hand along the fabric from one cut end to the other cut end, one direction feels smooth to the touch and when you go the opposite direction it will have a slight rough feeling.

Another factor to keep in mind, is that fabric with “nap” is probably better suited using a more simple or less intricate design.  Especially a fabric like Velvet, which is heavier or thicker in weight and will have a somewhat crushed look to it if there is a lot of top-stitching or lots of small design accents.

  • TIP:  If using a bulky fabric with nap that has facings, it might be helpful to use a lighter weight fabric for the facings to help eliminate some of the bulk.  Select a fabric that blends good with the main fabric and has the same type of washing or drying cleaning abilities too.

Remember to always do your pattern adjustments, if any,  prior to cutting out your fabric.  So next time you are planning to do a new “snoozing”, I mean sewing project, check out fabric with “nap” and see if it will work for your design.

  • TIP:  Double check your fabric for any “one-way” designs because again you will want to pin your pattern pieces so they are all going in the same direction so your fabric design will all be running the same way too.


Brushing fabric from left to right, rough to the touch on left side/smooth on right

 HAPPY CREATING!!

Disclaimer:  This post contains affiliate links – “small commission earned”


Sewing Machine Needle Info

When beginning a sewing project, you probably always get your supplies, fabric and pattern in order but don’t forget about the most important item needed for a beautiful finished project and that is your machine’s NEEDLE.

You should only stitch with one machine needle for at most 15 hours and then change it out for a new one.  Doing this keeps your needle sharp, the eye smooth for the thread and makes for less thread breakage and good, secure stitches for your particular project.   Be sure to refer to your sewing  machine manual for recommendations on proper needle sizes for your machine.

A brief scoop on the design of a sewing machine needle is that the higher number determines the diameter of the needle itself using the metric system and the lower number is the US system.  Machine needles range from being thin and flexible to a more heavy-duty thicker and stronger needle.   Also, the eye of the needles are smaller to larger depending upon the needle size to perform the right stitching task for that needle and fabric.

A 65/9 universal needle is a thin needle good for very light weight fabrics making small sewing holes too.   Just like a 100/16 is perfect for denim weight fabrics,  strong enough to handle stitching through your jeans.  You can even purchase a mixed needle package, i.e., size 70/10,   80/12,   and   90/14.   This is a good one to keep on hand because it gives you a wide variety of needles for light weight, medium weight and some heavy weight fabrics.

There are specialty needles too that should be purchased if you are going to sew with a specific type of fabric.  For example, if you decide to use a knit or stretch fabric, you really want to use a needle that has a medium ball point end to it so while you are sewing the needle doesn’t pick the fabric and your stitches are flexible with the stretch of a knit.   A stretch needle  75/11 would work nicely for delicate knit fabrics.

There are quilting and embroidery needles too which will give you a little larger eye to help compensate for all the friction the thread deals with when stitching these type of projects.   A sharp microtex  90/14  is ideal for top stitching and edge stitches.

Sometimes you will start out using one particular size needle and then maybe have to change to another size or specialty needle for the finishing sewing touches.  Just remember one size doesn’t fit all projects.

Now you say, do I really want to take the time to try and place that needle back into its package and not knowing how many hours I have sewn with that particular needle???  Here’s a quick and simple solution that I do with my different needles once I have sewn with them but not ready to discard them.  I purchased one of those cute little red tomato pin holders and I write on the various sections with a black marker the needle size,  i.e.,  9,  10,  11,  12,  14,  quilt,  emb.   As I need to change out needles, I just push the used needle into the proper section or I pull it out when I need that needle size again.   I know I’ve sewn with it already so then I kind of guesstimate my usage time.  You will get a feel for what needles you sew with more often than others.  Also, don’t ever sew over pins that will definitely put a damper on your needle!!

Needle Storage Cushion


Next time you have thread breaking problems and you are about to pull your hair out, think when was the last time I changed my needle or am I using the proper needle with my fabric.  Sometimes that very simple procedure of changing your sewing machine needle will fix those frustrating moments.

Medicine bottle pin and needle catcher

  • TIP:  I don’t like to just throw my used pins and needles into my trash can (sometimes I go dumpsy diving for fabric scraps) so I have a used medicine container that I have made a large hole in the top of the child proof  lid and I can just deposit my discarded pins and needles into the bottle.  When full, I can safely toss it away!!

HAPPY CREATING!!

Disclaimer:  This post contains affiliate links – “small commission earned”

All About Ruffles

Ruffles can be added to almost anything:  skirt or nightgown hems, decorate edges to a pillow, adding trim to a baby blanket, making a plain tee shirt into something extraordinary, the ideas are endless. Listed here you will find directions and tips on how I make my own ruffles or change up a ruffle within a pattern I already have.

CALCULATING THE SIZE

First, you need to determine the circumference (the distance around your item) of where you want to add the ruffle.  Next, decide how much gathering you want from your ruffle;  do you want a very full, fluffy ruffle or a more subdued, soft style ruffle.  A very full, fluffy ruffle would most likely be about 2.5 times your circumference, a little less full calculate 2 times your circumference and, even a less gathered ruffle would be 1.5 times your circumference.

Now figure how wide you want your finished ruffle.  You will double that width and add one inch for your seam (1/2″ for each side).  The reason I like to double the width of the finished ruffle is you will not have to hem your ruffle and it gives it a little more stability to help hold its shape and you have such a nice clean and professional look when completed.  This technique is called a double-layered ruffle.

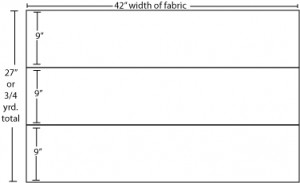
For example, your circumference is 40 inches and you want your ruffle to be 2.5 times the circumference and finished at 4 inches wide.  Your ungathered, cut ruffle will measure 100 inches (40 x 2.5 = 100) by 9 inches.

Your yardage requirements based on a 42″ wide fabric would be 3 widths with each width measuring 9″ for a total of 3/4 yard of fabric needed to make that size ruffle.  Don’t forget to add a 1/2″ seam allowance to each width for sewing them together to make your 100 inch ungathered, cut ruffle.
PREPARING YOUR RUFFLE

Using the above example, cut two (2)  strips 42″ by 9″ and cut one (1) strip 19″ by 9″, this includes your 1/2″ seam allowance on each end of each strip.  Now sew these three (3) strips together to form  one long strip of fabric.

Take your two (2) short ends, right sides together and sew these in a 1/2″ seam allowance making a circle of fabric.  Press open all your seams.  Now fold your fabric circle in half wrong sides together and press.

At this point, you can either place some pins around to hold your fold in place or baste a 1/4″ seam around your fabric circle to hold it together.

SEWING YOUR GATHERS 

This is my favorite way to sew/baste my threads for a project requiring me to gather the fabric.  I use my regular sewing machine thread which matches the fabric and I also use a heavy, duty sewing thread.  You can use Coats and Clarks Dual Duty XP Heavy thread, which is a thicker, stronger thread and will not break when you begin your gathering.

Now, lay the heavy thread close to the raw edge of your fabric circle, leaving about a 4″ tail, and begin to baste over your heavy thread with a zigzag stitch making sure not to catch the heavy thread in your machine zigzag stitching.  Set your machine for a longer and wider zigzag stitch but make sure that the stitching size stays within your 1/2″ seam allowance.

Zigzag over your heavy thread around your entire circle, again leaving about a 4″ tail of your heavy thread, cut  your regular threads close to the fabric and remove your fabric circle from the sewing machine.  This method of making gathering stitches can be used for almost any project that requires you to have to gather something.

Hang in there, you are almost ready to gather and sew your completed ruffle.

MARKING, PINNING AND SEWING RUFFLE TO GARMENT

At this step, it is important to divide both the ruffle and your garment into quarters.  Pin/match your ruffle markings to the garment markings with right sides together.  Now you can begin to gather your ruffle by pulling on those 4″ heavy thread tails and pinning it in place all the way around.  Having your ruffle and garment marked into quarters will insure that your ruffle is gathered evenly around.

Once you have it pinned, you can begin sewing the right sides together in a 1/2″ seam allowance.  Depending upon your project and the weight of your materials, you might want to reinforce your seam by sewing around the ruffle a second time.

You have a couple of options next, you can finish your raw edge by serging it, if you own a serger machine or do an overlock stitch to finish your edge, if you have that stitch available on your machine.  If you don’t have either of the above stitch capabilities, you can finish your edge with a close zigzag stitch by shortening and narrowing the zigzag stitch on your machine.

Depending upon your project, you can now lightly press the ruffle down and the seam up towards the garment.

I make double-layered ruffles all the time no matter what the pattern directions call for.  The only time I would use a single-layered ruffle would probably be when using a very thick/heavy fabric say for drapery treatments.  Remember too, you can cut your fabric strips on the bias  for more give or stretch, which will help the ruffle lay nicely especially along a curvy neckline.   Continue to sew your strips following the directions above.

You can lengthen a skirt, top or pants by adding a coordinating/contrasting ruffle to the garment, a great way to expand the life of clothing for children.  If wanting to add a ruffle to a pair of jeans, because of the thickness of the jeans, I would sew the raw edge of the ruffle to the wrong side of the jean.  Then you can take a cute decorative ribbon and sew that over the stitching line or add funky/colorful buttons along the stitching line.   Always adding those little extra touches, definitely makes the garment your own!!

HAPPY CREATING!!

Disclaimer:  This post contains affiliate links – “small commission earned”
Not the same old Resolution!!

The beginning of a new year makes us ready for resolutions of all kinds.  Why not take this time to organize all those sewing supplies, clean your sewing machine and stock up on your sewing notions!!

Make sure you have plenty of sewing needles:  Sizes 9, 10 are great for delicate fabrics, Sizes 12, 14 work for medium weight fabrics and Sizes 16, 18 are for those heavier fabrics like denim.  Sewing with a good, sharp needle can really make a difference when sewing and in the completed project itself.  One needle is good for about 15 hours of sewing.  Also, you can use little wire baskets to store your needles by sizes and types.

Now is a great time also to read your sewing machine manual again to make sure you are oiling it correctly.  Take off the needle plate and use a little brush to remove all those pesky thread fuzzies!!  Keep a small makeup brush in your supply stash to dust your machine regularly.

Purchase some new bobbins for your machine to have ready for all those projects you have dancing in your head.  Nothing worse than to begin a new activity and realize all your bobbins are filled with the wrong color of thread.  Also, organize your spools of thread by color on a thread rack.  They are ready at a glance for that inspirational moment that strikes at 10:00 p.m. or, like me, at 5:00 a.m. Take a moment to sort bias tapes, elastics, Velcro, etc. into small totes for easy access.  Small canning jars work nicely for buttons and make for a fun display too.  Sorting your buttons by color is really a time saver.

A couple of sewing references that I enjoy checking out are Clotilde and Atlanta Thread and Supply.

Just taking an afternoon or weekend getting your sewing space organized, labeled, and cleaned up will not only brighten your area but will give you that “feel good” fuel to generate new projects.

HAPPY CREATING!!

Disclaimer:  This post contains affiliate links – “small commission earned”