Preparing Crochet Edges

Depending upon my project, here’s a little crochet tip that I like to do which helps to prepare my piece for seaming or joining.

I like to finish off my crochet piece by bordering it with one row of single crochet stitches around the entire square or garment.  I even like to do this when not joining because it gives a nice, clean, professional look to your piece.

Basically, when you get to the end of your pattern, don’t fasten off, just continue around making a single crochet into every stitch within your project.  That border row of single crochet will be where you will place your joining stitches to form your seam.   Here are a few examples showing how to single crochet an edge.  Complete your single crochet on working edge, when you get to the corner,  complete three single crochet stitches in corner to keep edge from curling.  Continue with single crochet on next edge by inserting your needle along the edge stitches.  Keep them spaced fairly even so that your piece doesn’t curl and keep track of how many single crochet stitches you do so that you can do the same amount on the other side edge for a square, rectangle match the east/west sides with same number and the north/south sides with the same amount of stitches.  Next corner do your three single crochet and do one single crochet in each chain stitch so you have the same amount of single crochet stitches across the bottom edge as you do the top edge.  Continue with this pattern until you get back to the beginning corner of your top edge and fasten off.

Working sc along side edge

Showing how I insert hook along side edge


Showing 3 sc in corner stitch

How sc look along your finished piece

If making a garment, you might only want to single crochet along the places that need to be seamed; along sleeve and side seams.  Take into consideration the design and what works best for your particular pattern or design.


*TIP FOR JOINING:    Make sure that you use the same type of yarn as your project.  You can use a different color if you want contrast but if your project called for acrylic yarn, then use acrylic yarn for stitching seams or if you used merino wool yarn, then join using merino wool yarn, etc.  You get the picture.


HAPPY CREATING!!

Disclaimer:  This post contains affiliate links – “small commission earned”

Crocheting “Extras”

Now that you are sitting in your most comfortable chair and are surrounded by a pile of wonderful yarn just itching to be crochet into something special, take a moment to review the following items that I think will make your yarning experience much easier and more convenient.  These are some of my favorite crochet “extras”.

Having a crochet case to organize all your hooks by specific size will save you a lot of time and frustration.  When I first started crocheting, I would just place my hooks in a Ziploc bag and would have to rummage through them all to find the specific hook I needed for my pattern.  With the case, I just quickly slide my hooks into their own slot by number/letter size.   There are a wide variety of styles available.  I personally use a zippered style case because I can also enclose some of my other accessories with my hooks to keep them all in one place.

Another great accessory to have are some stitch markers.   I like the split lock markers that look like plastic safety pins.  They are light in weight, easy to use and colorful so you can select ones that will stand out when you are crocheting.  Budget constraints an issue, you can also use a different color of yarn and tie it in the stitch where the pattern calls for a marker to be placed. Works the same, just takes a little longer to tie and untie the yarn marker.

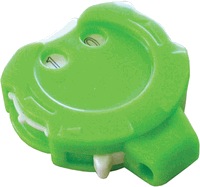
For me, a must have “extra” is a row counter.   I use to make pencil marks on a piece of paper to count my rows, which, believe me, is a very time-consuming way for counting.  Now with a counter sitting on the arm of my chair, one click and I’ve counted my completed row and can tell at a glance how many more rows I need to do.  I like the style that has a locking mechanism so my counter never loses its place, especially if I have to put my project away and all my rows haven’t been completed.

You’ll find that a necessary accessory is a tapestry/yarn needle.  They have a very large eye which makes quick work of threading your yarn through the needle.  There are different kinds of needles, ones with a straight tip or you can purchase a style with a curved tip.  It is nice to have both types of yarn needles in your crochet stash.

Of course, a small retractable tape measure and 4″ embroidery style scissors are needed too.  

A crochet tote or lovely basket is a great way to store your supplies and/or yarn.  Place it by your comfy chair and have everything right at hand when you decide to work on your project and looks great too.  *TIP:  one way to keep your working skein of yarn readily available is to seal it within a plastic Ziploc bag, cut a small hole in the corner of the bag itself and have your yarn come out of that opening.  Helps to keep the ball of yarn contained and tangle free.

An Ott Lamp or Daylight Lamp to work by is most helpful and helps reduce stress on your eyes.  Also, comfort grips which slide onto your hooks or comfort grip hooks themselves will help you with fatigued hands and wrists.

Of course, you will be able to locate some of these crocheting accessories at your big box sewing/craft stores.  But don’t forget to check out some websites like Knitting Warehouse and Yarn.com for a wide variety and unique crocheting “extras” too.

Hopefully, some of these suggestions will lend themselves to giving you a great crocheting experience!!!


HAPPY CREATING!!

Disclaimer:  This post contains affiliate links – “small commission earned”

All About Ruffles

Ruffles can be added to almost anything:  skirt or nightgown hems, decorate edges to a pillow, adding trim to a baby blanket, making a plain tee shirt into something extraordinary, the ideas are endless. Listed here you will find directions and tips on how I make my own ruffles or change up a ruffle within a pattern I already have.

CALCULATING THE SIZE

First, you need to determine the circumference (the distance around your item) of where you want to add the ruffle.  Next, decide how much gathering you want from your ruffle;  do you want a very full, fluffy ruffle or a more subdued, soft style ruffle.  A very full, fluffy ruffle would most likely be about 2.5 times your circumference, a little less full calculate 2 times your circumference and, even a less gathered ruffle would be 1.5 times your circumference.

Now figure how wide you want your finished ruffle.  You will double that width and add one inch for your seam (1/2″ for each side).  The reason I like to double the width of the finished ruffle is you will not have to hem your ruffle and it gives it a little more stability to help hold its shape and you have such a nice clean and professional look when completed.  This technique is called a double-layered ruffle.

For example, your circumference is 40 inches and you want your ruffle to be 2.5 times the circumference and finished at 4 inches wide.  Your ungathered, cut ruffle will measure 100 inches (40 x 2.5 = 100) by 9 inches.

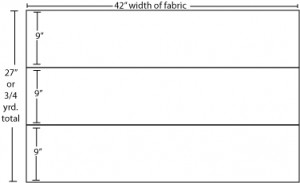
Your yardage requirements based on a 42″ wide fabric would be 3 widths with each width measuring 9″ for a total of 3/4 yard of fabric needed to make that size ruffle.  Don’t forget to add a 1/2″ seam allowance to each width for sewing them together to make your 100 inch ungathered, cut ruffle.

PREPARING YOUR RUFFLE

Using the above example, cut two (2)  strips 42″ by 9″ and cut one (1) strip 19″ by 9″, this includes your 1/2″ seam allowance on each end of each strip.  Now sew these three (3) strips together to form  one long strip of fabric.

Take your two (2) short ends, right sides together and sew these in a 1/2″ seam allowance making a circle of fabric.  Press open all your seams.  Now fold your fabric circle in half wrong sides together and press.

At this point, you can either place some pins around to hold your fold in place or baste a 1/4″ seam around your fabric circle to hold it together.

SEWING YOUR GATHERS 

This is my favorite way to sew/baste my threads for a project requiring me to gather the fabric.  I use my regular sewing machine thread which matches the fabric and I also use a heavy, duty sewing thread.  You can use Coats and Clarks Dual Duty XP Heavy thread, which is a thicker, stronger thread and will not break when you begin your gathering.

Now, lay the heavy thread close to the raw edge of your fabric circle, leaving about a 4″ tail, and begin to baste over your heavy thread with a zigzag stitch making sure not to catch the heavy thread in your machine zigzag stitching.  Set your machine for a longer and wider zigzag stitch but make sure that the stitching size stays within your 1/2″ seam allowance.

Zigzag over your heavy thread around your entire circle, again leaving about a 4″ tail of your heavy thread, cut  your regular threads close to the fabric and remove your fabric circle from the sewing machine.  This method of making gathering stitches can be used for almost any project that requires you to have to gather something.

Hang in there, you are almost ready to gather and sew your completed ruffle.

MARKING, PINNING AND SEWING RUFFLE TO GARMENT

At this step, it is important to divide both the ruffle and your garment into quarters.  Pin/match your ruffle markings to the garment markings with right sides together.  Now you can begin to gather your ruffle by pulling on those 4″ heavy thread tails and pinning it in place all the way around.  Having your ruffle and garment marked into quarters will insure that your ruffle is gathered evenly around.

Once you have it pinned, you can begin sewing the right sides together in a 1/2″ seam allowance.  Depending upon your project and the weight of your materials, you might want to reinforce your seam by sewing around the ruffle a second time.

You have a couple of options next, you can finish your raw edge by serging it, if you own a serger machine or do an overlock stitch to finish your edge, if you have that stitch available on your machine.  If you don’t have either of the above stitch capabilities, you can finish your edge with a close zigzag stitch by shortening and narrowing the zigzag stitch on your machine.

Depending upon your project, you can now lightly press the ruffle down and the seam up towards the garment.

I make double-layered ruffles all the time no matter what the pattern directions call for.  The only time I would use a single-layered ruffle would probably be when using a very thick/heavy fabric say for drapery treatments.  Remember too, you can cut your fabric strips on the bias  for more give or stretch, which will help the ruffle lay nicely especially along a curvy neckline.   Continue to sew your strips following the directions above.

You can lengthen a skirt, top or pants by adding a coordinating/contrasting ruffle to the garment, a great way to expand the life of clothing for children.  If wanting to add a ruffle to a pair of jeans, because of the thickness of the jeans, I would sew the raw edge of the ruffle to the wrong side of the jean.  Then you can take a cute decorative ribbon and sew that over the stitching line or add funky/colorful buttons along the stitching line.   Always adding those little extra touches, definitely makes the garment your own!!

HAPPY CREATING!!

Disclaimer:  This post contains affiliate links – “small commission earned”

Wonderful World of Buttons

To me, one of the most versatile craft/sewing notions is the BUTTON.  Not only are they practical, fun, and whimsical but beautiful to look at too, especially some of those vintage buttons.  They are also a great item to use with children to rouse the creative juices and to introduce sewing interests.   All ages enjoys dipping their fingers into a big pile of buttons!!     

With very little ones and with the supervision of an adult, you can just string buttons onto a heavy twine or crochet cotton thread (size 3).  Make squilly little snakes, catepillars or pretend your button string is a train, whatever the imagination dreams up.  Your can introduce colors to little ones too, just by sorting your buttons into piles of red, green, blue, etc.   Then replace them back into your container for the next time you have a button moment!!

Older children would enjoy making a sock puppet – simply take that old sock that has a hole in it or the one you never found its mate (probably eaten by the washing machine or dryer) and sew buttons onto the heel of the sock for eyes and a nose.  Felt could be used for a tongue, lips, ears or big circles sewn under the button eyes, then eyelashes could be added.  Just have fun!!

Buttons can be used to decorate the front of a tee shirt – trace a heart shape onto the tee shirt, then sew buttons onto your tracing line to make a button heart.  Be creative, use different colored thread for each button.  No need to match colors of buttons to thread colors.  Another idea would be to use DMC floss as your thread.  Placing button on your tee shirt, sew the thread from the right side to your shirt and back through to the right side, then tie the button with a square knot and leave about 1/2″ tail after making the knot to give another dimension to the look.

HOW TO MAKE A SQUARE KNOT:  take your two threads, one in the left hand and one in the right hand.  Tie the right thread over the left and pull tight, then tie the left thread over the right and pull tight.  Makes for a very secure knot.  A quick way to remember how to make a square knot is the saying:  right over left and left over right.                                                                                 

The ideas are limitless:

  • Sew buttons to the edges of your jean pockets
  • Decorate the bottom of your jeans with different colors and sizes of buttons
  • Take a shirt and sew a flower design onto the pocket
  • Add them to a cuff of a shirt and have a build-in bracelet look
  • Or sew them to the neckline of a tee shirt
  • Use with construction paper and sew or glue them to make a picture of funny animals or a mosaic design
  • Check out Artists Helping Children arts&crafts

Just keep a large jar readily available and fill it with buttons that have been removed from a shirt, coat or blazer.  You can purchase bags of inexpensive buttons at a very reasonable cost and dump them into your button jar for those rainy day craft moments.  Ask grandma or grandpa for any old buttons that they might have to add to your colorful collection.  Don’t forget to check out clothing at a garage sale for that really unique button too.  Buttons are just the best!!!

HAPPY CREATING!!

Disclaimer:  This post contains affiliate links – “small commission earned”


Abbreviations in Crochet Patterns


I know from experience that reading a crochet pattern can be intimidating but with practice, it definitely becomes easier.  For starters, I’ve listed below some of the more commonly used abbreviations that you will find within a crochet pattern’s directions.  About.com Crochet is a wonderful site to find good demonstrations on these various stitches:

  • alt           –      alternate
  • beg         –      begin/beginning
  • BLO       –      back loop only
  • bls          –      boucle loop stitch
  • BPdc      –      back post double crochet
  • BPsc      –      back post single crochet
  • C             –      crossed stitch
  • CC          –      contrasting color
  • Cdc         –      crossed double crochet
  • ch           –      chain stitch
  • ch-sp     –      chain-space
  • CL          –      cluster
  • cont       –      continue
  • dc           –      double crochet
  • dc2tog  –      double crochet two together
  • dec        –      decrease
  • dsc        –      double single crochet
  • dtr         –      double treble
  • ea          –      each
  • Els        –      extended loop stitch
  • Esc        –      extended single crochet
  • FLO      –      front loop only
  • FPdc     –      front post double crochet
  • FPsc     –      front post single crochet
  • FPtr      –      front post treble
  • hdc       –      half double crochet
  • inc        –      increase
  • KS         –      knot stitch
  • lks        –      locking stitch
  • lp          –      loop
  • ls          –      loop stitch
  • MC       –      main color
  • och       –      overlaid chain
  • pat st   –      pattern stitch
  • pc         –      popcorn stitch
  • pm       –      place marker
  • qtr        –      quadruple treble
  • rem      –      remaining
  • rev dc  –      reverse double crochet
  • rev sc  –      reverse single crochet
  • rf          –      relief stitch
  • rnd      –      round
  • RS       –      right side
  • sc        –       single crochet
  • sc2tog –      single crochet two together
  • Sl st     –      slip stitch
  • sp         –      space
  • st          –      stitch
  • tch       –      turning chain
  • tr          –      treble
  • tr2tog  –      treble two together
  • WS       –      wrong side
  • yo         –      yarn over

These are pretty standard abbreviations that you will find in most American written patterns.  When starting a new crochet project, I would recommend reading through the pattern to familiarize yourself with the abbreviations used.  Most of the time, you will find a stitch guide within the pattern or pattern book itself showing you or telling you exactly how to make a certain stitch or cluster.

One of my favorite books to use as a reference is The Complete Photo Guide to Crochet by Margaret Hubert.  Within the pages of this book are wonderful colored pictures of stitches, tools, tips, techniques and some patterns.  I like to have it readily available especially if I’m working on a new pattern and have to refresh myself on how to do a certain stitch or planning a new project.

Should a pattern use a new stitch for you, why not practice that stitch over and over again with some old yarn (making swatches) so that you will have it mastered and looking perfect for your special crochet project.  This would be a super time to encourage crocheting to a young child; you both could practice the new stitch/cluster together.  What a wonderful and creative way to spend an hour or so one-on-one making your own swatches!!!

HAPPY CREATING!!

Disclaimer:  This post contains affiliate links – “small commission earned”