Comfy Hold on your Crochet Hook

The way you hold your crochet hook is a very personal thing.  The most important thing to remember is not to grip it so hard that your hand muscles and fingers become exhausted.  To me, that takes the fun out of crocheting!!  Just a light but secure grip is all that is needed.

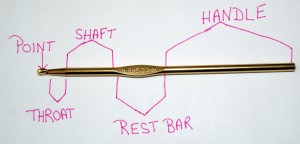
I guess first it is helpful to dissect a crochet hook.  You have the point, throat, shaft, thumb rest and handle.  The shaft and thumb rest is where your fingers will always be when crocheting.  The point and throat are where you actually make your stitches and the handle is basically there for balance.

Hook Description


My grandmother originally taught  me how to crochet but being the only left-handed person in my family, she could only teach me how to hold the hook like a right-handed crocheter.  Actually,  I have found that holding and working the crochet hook in my right hand and controlling the yarn with my left hand really is much easier for me because the hook movement is just a repetitive motion but keeping the tension and working with the yarn requires more control.  Using my left hand for the more intricate work (which is my stronger and more coordinated hand) works great for me!!

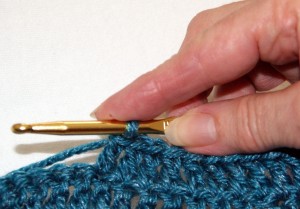
You will probably crochet using either a Pencil Grip or a Knife Grip.  I use the knife grip when I crochet and find it very comfortable and easy for me.  With my right hand, I place my thumb on the front of the thumb rest which will be facing me, place my index finger onto the shaft and hold the back of the thumb rest against my middle finger.  The handle will just lay against my ring finger and the palm.  There is very little movement of my fingers on my right hand when I crochet.  I slightly move my index finger along the shaft to help hold the loops in place as I make my stitches and that is it.

Knife grip using right hand

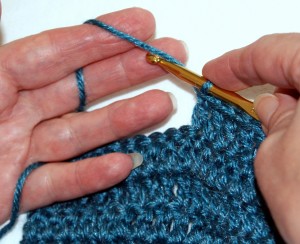
Now my left hand does a lot more work for me.  I personally like to wrap the yarn around several fingers to get good tension on the yarn.  I will place the yarn under my pinky finger, over my ring finger, under my middle finger and over my index finger.  My crochet piece will be held in place using my middle finger and thumb with my ring finger and pinky helping to hold ever so slightly.  My index finger on my left hand does all the work.  I yarn over onto the hook with my left index finger, push the point of the crochet hook through the proper loops using my right hand and bracing with my left middle finger, guiding with my left thumb, and using my left ring finger and pinky as support.  I have great success crocheting in this manner.   I don’t know if this is the motion a true right-handed crocheter uses but I have found this a very workable method for me and I am a very left-handed individual.   I even use my left foot to push the pedal on my sewing machine!!

Yarn weave through my left hand fingers


Doing a Stich


Keep practicing and work on what is really comfortable for you when crocheting.  Hopefully, this will give you some guidelines whether you are right or left-handed for holding your hook and work.  I know there are some good directions for left-handed crocheting if this method doesn’t work for you.  Give it a try, you might like it!!

  • TIP:  If you are really a beginner or if you are trying to teach a youngster how to crochet,  I would suggest that you only wrap the yarn over your left index finger as your tension guide until you get the feel of both hands and yarn working together.   After you feel comfortable with practice, then proceed to weave the yarn around the additional fingers on your left hand.

HAPPY CREATING!!

Disclaimer:  This post contains affiliate links – “small commission earned”
A Scrappy Moment

If you love and enjoy sewing and quilting projects as much as I do, you know that you always have a ton of SCRAP fabrics leftover.  I just have the hardest time throwing those little scraps away.  I tell myself that surely I can find another use for them.   In the meantime, I neatly (as best as you can neatly store scraps) place them into a large plastic storage bin waiting for just that perfect project.

Actually. what really ends up happening is that storage bin has become the greatest place for little fingers to rummage through and get their creative juices flowing.  Needle and thread is not always required but sometimes glue is a must!!

A lot of those little scraps turn into baby doll clothing and accessories, especially for Barbie and her friends.  Take a simple rectangle of fabric, cut two small circles for arms, take a narrow strip of another scrap for a belt and viola you have a coat, or a beach coverup, or a dress whatever design fits the moment.   Make a temporary bed for your doll by laying out another square or rectangle of fabric placing it on the floor then fold up another scrap for a pillow.   A wonderful opportunity to be creative, not only with a simple design but also with color and texture.

One of my favorite scrappy projects is to let your little one select several different colored scraps (blue, green, yellow, red,) and make a mosaic picture.

Simple supplies needed in addition to your scraps:  Scissors, Glue and Construction Paper (or any paper that you have on hand, a good time to recycle a brown paper bag).

Depending upon the age of your child, you will need to cut or help them cut out random shapes and sizes from all the colors of  fabric that they selected.   Don’t worry about fabric fraying, that is what makes it one-of-a-kind.   Let them draw a picture or a shape or just a doodle design onto the paper.  Now for the FUN part, take a fabric shape and glue it onto the drawing.  Continue gluing fabric pieces until you have a completed masterpiece!

If you have a collection of ribbons, yarns, beads, buttons that are looking for a place other than on a shelf, these items make great additions to your mosaic picture.  Please keep in mind the age of your creative little one, you don’t want to use teeny tiny items with very small children!!

  • TIP:  If your child is older,  a simple gluing method is to pour some glue into a plastic, disposable bowl, thin down with a little water, and use a paint brush to adhere the glue to your fabric shape.

HAPPY CREATING!!!

Disclaimer:  This post contains affiliate links – “small commission earned”


MATTRESS/WEAVING STITCH

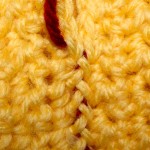
The MATTRESS STITCH or WEAVING STITCH is a very nice joining method especially for garments because it is virtually invisible.  When joining with this stitch, you  have your right sides facing you, side by side. Insert your needle through both loops on both pieces at the bottom edge, leaving about a 4″ tail, repeat again in the same stitch to help secure your thread.  Push your needle through both edge loops on the right side of the seam.  Pull the yarn through loosely.  Now insert the needle through both edge loops of the matching stitch on the left side.  Remember, to always keep your tapestry needle facing to the top of your piece and not to the side.  Continue alternating the joining stitches until you get to the end of your seam.  After completing about 3 stitches, pull your yarn snug and continue joining.

This stitch is a little harder to do with crochet stitches because you don’t have a cross-bar stitch like in knitting.  It is similar to doing a blind stitch in sewing.  As you can see from my pictures though, you form little “x’s” when you pull up your joining stitch snuggly and it is virtually invisible.  I used a very dark contrasting yarn for demonstration purposes but using your matching yarn, the joining seam will disappear.

Inserting needle from left to right under both loops on both sides


Pulling mattress stitch snuggly to join


Joining seams for your crochet projects is really a simple procedure.  Take your time and decide upon which joining method you prefer and will work the best for your finished piece.  Remember to weave in all your loose yarn tails too!

Spend some time with a youngster who might be interested in making crochet squares, and work together joining them into a cute baby doll blanket or a small coverlet to curl up with in the car or for reading books.  Who doesn’t like something handmade!!

HAPPY CREATING!!

Disclaimer:  This post contains affiliate links – “small commission earned”

Doing the BACK STITCH

Doing the BACK  STITCH is another method for joining seams as well as for adding decorative appliques or pockets to your crochet project.  This is also a great opportunity to use a contrasting color of yarn to make your applique or pocket designs really stand out.  

To do the Back Stitch for a seam, you will need to place your two pieces that need joining with the right sides together and hold it with one side (called the front) facing you and the other side (called the back) facing away from you.  Thread your yarning needle and pull the needle through both loops on both pieces leaving about a 4″ tail, I like to insert my needle again in that first stitch to help secure my thread.  Stitching from the front of your joining seam that would be facing you, insert your needle into the next stitch going through both loops on both pieces, pull snuggly. Skip the next stitch and insert from the back to the front through both loops on both pieces and pull your needle to the front.  Now, insert your needle from the front to the back through both loops on both pieces through the skipped stitch.  Continue this pattern until you have completed your joining seam.

Preparing your crochet project for a decorative applique or outer pocket remember to place your applique/pocket with the wrong side down onto the right side of your crochet project.   Figure out where you would like the applique/pocket to be placed or follow recommended directions from your pattern and pin your applique/pocket into place.  I use long-stemmed quilting pins with the round, glass ball ends (not with the flower end because the flower design will catch onto your yarn and maybe pull it).  Of course, if you have a very small item you are attaching to your piece, use smaller stemmed pins with the round ball tops.

Once you have your applique/pocket pinned to your project, you can begin doing the back stitch but this time you will need to insert from the back of your project leaving a 4″ tail, coming out the front of your applique/pocket.  Insert your needle from the front to the back in the very next stitch.  Now you will skip the next stitch, insert needle from the back to the front.  Now insert again from the front going through the stitch that you just skipped.  Continue with this process until you are done.  Don’t knot, leave a tail and weave both beginning tail and ending tail through your crochet stitches.

You can always attach your applique/pocket with a straight running stitch or whip stitch too.  It all depends upon the look you are achieving and how durable your item needs to be held in place.


*TIP:  Update an old sweater or hat with a funky crochet applique.  Teach a simple crochet motif to a youngster and let them update a piece of clothing or attach to a headband or barrette.  Adding your own personal touches to a store-bought item definitely makes it uniquely yours.

HAPPY CREATING!!!

Disclaimer:  This post contains affiliate links – “small commission earned”


WHIP STITCH

After completing your crochet piece, you have several options available as to how you want to join the seams of your project.  Probably the most common method of joining is the WHIP STITCH.   This joining method is not too bulky and creates a nice seam.

To begin, place your completed pieces right sides down and side by side.  Now you need to thread your tapestry/yarn needle.  I found this site that gives you a couple of different suggestions on how crafters thread a needle with yarn.  Myself, I fold my yarn in half and pinch that folded edge tight while holding the yarn very close to the edges of my index finger and thumb.  Now I  just slide or work the eye of the needle onto the yarn and pull through the edge of the loop.  You never knot the end of your yarn as you will just weave your tail through you stitches once you have completed your joining process.

Once your needle is threaded, leave about a 4″ tail for weaving and starting at one end, push the needle through both loops of your crochet stitches on both pieces that you are joining.  Some patterns might tell you to join by only going through one loop on each side of your seam.  Of course this is fine but take into consideration your finished project and if it needs to withstand heavy usage, I would recommend that you always insert through two loops on both pieces of your seam.  Pull the yarn snug but not too tight (you don’t want puckering) so that the two pieces fit closely against each other.  Draw your needle up and over and insert it into the next stitch. You will always be inserting your needle on the same side.  For example, if you begin joining by inserting your needle from the right side to the left (or vice versa) , that is how you would continue whip stitching until you reached the end of your seam.

*TIP:   Keep some practice swatches among your yarn stash so you can try out different joining stitches.  For a more dramatic look, you could use a contrasting color of yarn for your piece, just make sure your joining yarn is the same type and ply as your finished crochet project.

HAPPY CREATING!!

Disclaimer:  This post contains affiliate links – “small commission earned”