
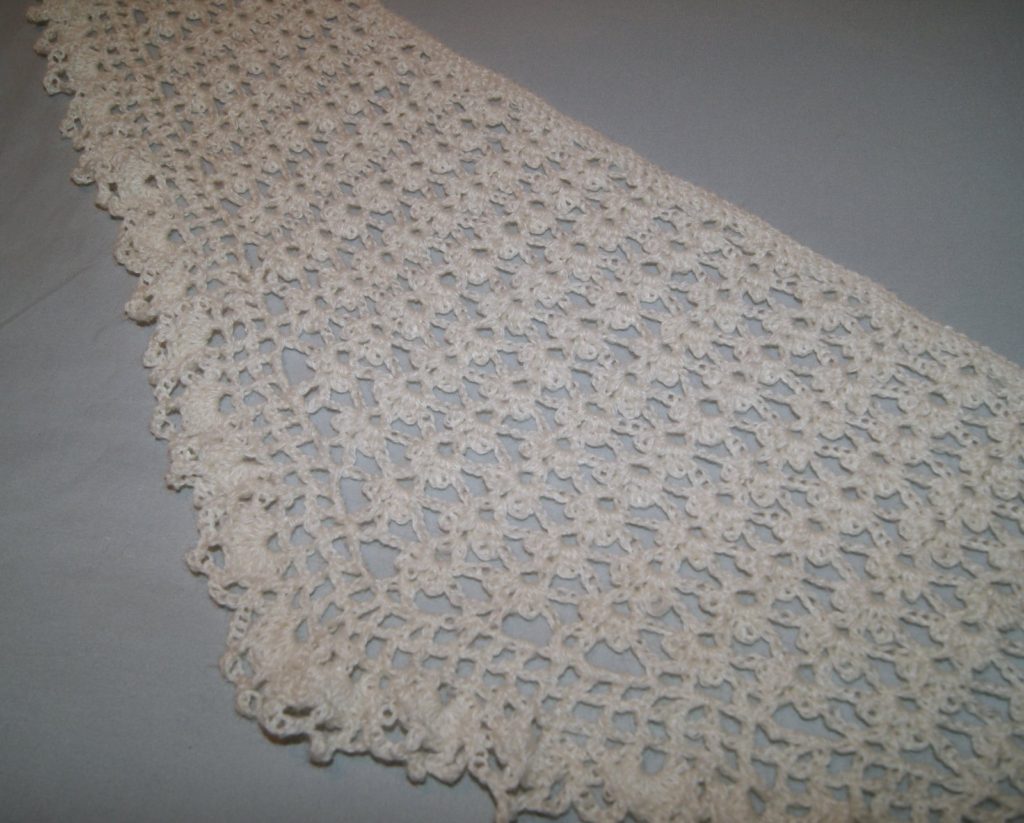
Blocking on mats


Before blocking
After blocking
Before blocking

After blocking
HAPPY CREATING!!
Disclaimer: This post contains affiliate links – “Commissions Earned”Blocking on mats
Before blocking
After blocking
Before blocking
After blocking
HAPPY CREATING!!
Disclaimer: This post contains affiliate links – “Commissions Earned” There is 1,094 yards on this lace weight skein for just $18.00 (enough for a whole project). Wow, got my juices flowing but dyeing ~ never attempted that before ~ always a 1st time for everything ~ so I made my purchase and headed home to surf the net for ideas, directions, suggestions!!
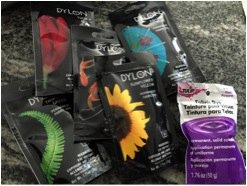
After much research, I found some helpful information so now off to the big box store to find types of dye. Lots of different brands to choose from but I decided upon Dylon Permanent Fabric dye. Of course, I had to select 6 different colors too!!! Used a Tulip brand for my purple color as that was the only one available ~ go figure!!
Spent about $18.00 on my 6 packages of dye and I purchased some plastic squeeze bottles too for good control over where I wanted to place my colors.
There is 1,094 yards on this lace weight skein for just $18.00 (enough for a whole project). Wow, got my juices flowing but dyeing ~ never attempted that before ~ always a 1st time for everything ~ so I made my purchase and headed home to surf the net for ideas, directions, suggestions!!
After much research, I found some helpful information so now off to the big box store to find types of dye. Lots of different brands to choose from but I decided upon Dylon Permanent Fabric dye. Of course, I had to select 6 different colors too!!! Used a Tulip brand for my purple color as that was the only one available ~ go figure!!
Spent about $18.00 on my 6 packages of dye and I purchased some plastic squeeze bottles too for good control over where I wanted to place my colors.
 Now I was ready ~ first I had to soak the yarn in a 50/50 mixture of white vinegar and cold water for 24 hours. All those worrisome thoughts were running through my head, but after the 24 hour soak, the yarn was ready for the next step and was still in a nice workable hank 🙂
 Remove the skein of yarn from the soaking mixture and pat dry so it is just DAMP to the touch not dripping. Now I laid paper towels out and then placed several layers plastic wrap over them to make sure all my seams were covered.
Now the fun part ~ dyeing!! Follow the manufacturer’s directions but I used a pinch of salt (didn’t measure), 2 cups of luke warm water, and half the dye package. Which was way too much dye, just a fourth of the package would have been sufficient.
I was going for a rainbow effect and was very pleased with how everything was going at this point. I didn’t wear gloves but you could wear some latex gloves if you don’t want to get any dye on your hands.
Pictured here is what I ended up with after I squeezed dye onto the yarn. I recommend that you kind of move the yarn around with the tip of the bottle to make sure that you get your dye through all the yarn.
Remove the skein of yarn from the soaking mixture and pat dry so it is just DAMP to the touch not dripping. Now I laid paper towels out and then placed several layers plastic wrap over them to make sure all my seams were covered.
Now the fun part ~ dyeing!! Follow the manufacturer’s directions but I used a pinch of salt (didn’t measure), 2 cups of luke warm water, and half the dye package. Which was way too much dye, just a fourth of the package would have been sufficient.
I was going for a rainbow effect and was very pleased with how everything was going at this point. I didn’t wear gloves but you could wear some latex gloves if you don’t want to get any dye on your hands.
Pictured here is what I ended up with after I squeezed dye onto the yarn. I recommend that you kind of move the yarn around with the tip of the bottle to make sure that you get your dye through all the yarn.
 HINT: Start with your lightest colors first (yellow, orange, green, red, blue, purple)
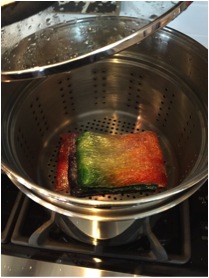
At this point, you want to seal the skein of yarn with the plastic wrap. I essentially folded one long side over the yarn, folded the other long side over, then the ends and then folded this tube in half then in half again. (Your goal is to just keep the dye from going everywhere during the steaming process). Now you were suppose to place your wrapped yarn inside a double boiler for 45 – 60 minutes with the lid on the pot.
Oooh ~ my lack of patience and my thought that I was going to end up with a big felted piece made me deviate from the instructions!!! So I “cooked” it for only 35 minutes with no lid but my end result came out as a softer, less vibrant color but perfect for a Spring/Summer project. I loved it!!!!
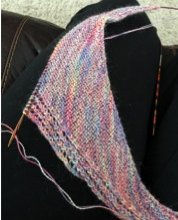
Once you have completed the steaming process, place your yarn in the sink to let it cool. You don’t want to shock the yarn and go straight into cold water as you would end up with a big piece of felt!! After about 15 minutes, I removed the plastic wrap from the yarn and ran it under cool water in the sink. Here was what my yarn looked like after the first rinse. I let it sit for a few minutes and then did another rinse in water. I did a third rinse as there was still dye coming off the yarn and onto the paper towels. I let the yarn air dry on the counter top until it was fully dry ~ about 48 hours. Once dried, I wound my skein and this is what I ended up with. I’m currently making a Trillian scarf out of it. (You can find the pattern on Ravelry) and I’m doubling the yarn as I knit it. I really love how it is turning out.
HINT: Start with your lightest colors first (yellow, orange, green, red, blue, purple)
At this point, you want to seal the skein of yarn with the plastic wrap. I essentially folded one long side over the yarn, folded the other long side over, then the ends and then folded this tube in half then in half again. (Your goal is to just keep the dye from going everywhere during the steaming process). Now you were suppose to place your wrapped yarn inside a double boiler for 45 – 60 minutes with the lid on the pot.
Oooh ~ my lack of patience and my thought that I was going to end up with a big felted piece made me deviate from the instructions!!! So I “cooked” it for only 35 minutes with no lid but my end result came out as a softer, less vibrant color but perfect for a Spring/Summer project. I loved it!!!!
Once you have completed the steaming process, place your yarn in the sink to let it cool. You don’t want to shock the yarn and go straight into cold water as you would end up with a big piece of felt!! After about 15 minutes, I removed the plastic wrap from the yarn and ran it under cool water in the sink. Here was what my yarn looked like after the first rinse. I let it sit for a few minutes and then did another rinse in water. I did a third rinse as there was still dye coming off the yarn and onto the paper towels. I let the yarn air dry on the counter top until it was fully dry ~ about 48 hours. Once dried, I wound my skein and this is what I ended up with. I’m currently making a Trillian scarf out of it. (You can find the pattern on Ravelry) and I’m doubling the yarn as I knit it. I really love how it is turning out.


 With my second dyeing process ~ I used a skein of Apollo from Catnip Yarns, 50% silk & 50% Merino wool. They sell only natural, undyed yarn. It’s super soft and more of a chunky weight.
I did everything the same EXCEPT I used only half the amount of dye (1 cup of water, ¼ of the dye package), and I feel, most importantly, I used the double boiler, on a high heat, with the LID on for 50 minutes for steaming. My end result was the vibrant rainbow that I initially was striving for.
With my second dyeing process ~ I used a skein of Apollo from Catnip Yarns, 50% silk & 50% Merino wool. They sell only natural, undyed yarn. It’s super soft and more of a chunky weight.
I did everything the same EXCEPT I used only half the amount of dye (1 cup of water, ¼ of the dye package), and I feel, most importantly, I used the double boiler, on a high heat, with the LID on for 50 minutes for steaming. My end result was the vibrant rainbow that I initially was striving for.


 I know I will attempt this fun and creative process again. Hope you will give it a try ~ would love to see pictures too 🙂 Check out Dharma Trading Co. for more information on dyeing yarn.
HINT: I am still using the original dye packages that I purchased and I feel certain that I can create another rainbow skein before I would need to purchase more!!
I know I will attempt this fun and creative process again. Hope you will give it a try ~ would love to see pictures too 🙂 Check out Dharma Trading Co. for more information on dyeing yarn.
HINT: I am still using the original dye packages that I purchased and I feel certain that I can create another rainbow skein before I would need to purchase more!!
HAPPY CREATING!!
Disclaimer: This post contains affiliate links – “Commissions Earned”Wishing everyone a Happy Mother’s Day and hope your day has been extra special too!!

SONY DSC
Just wanted to share this awesome “yarn bouquet” that I received as a gift. As much as I love to have fresh flowers around, this bouquet is just as special as I get to look at it and decide what do I want to create!! This bouquet was shipped through Jimmy Beans Wool website and I received 3 gorgeous skeins of a beautiful Madeleine Tosh DK yarn with two different sizes of knitting needles. It came with a lovely pattern that I downloaded through Ravelry called Sylkie Cowl by Gudrum Johnson.

SONY DSC
I also downloaded 2 other “free” patterns from Ravelry: one is called Mara by Amy Hendrix which is a triangle shawl and the other is called Honey Cowl by Ann Maria. Both of these patterns are really cool too!! However, I think I am going to give the Sylkie Cowl a try. As I have mentioned before, my real yarn love is crocheting but I am adventuring out in the knitting world and this pattern does offer some new techniques for me to try. If you are looking for a unique rolex gift to get your favorite yarning person, then check out JB’s website, I don’t think you will be disappointed. Wish me luck as I attempt this new pattern. Hey, if I think it looks horrible, I can just frog it and find another “crochet” pattern~~ ha, ha, ha!!
HAPPY CREATING!!
Disclaimer: This post contains affiliate links – “Commissions Earned”
It is always an exciting moment when I hang up the new calendar welcoming in the New Year!! For me, it is like a clean slate just begging to have something new written on it.

Already have some new fabrics and yarns just waiting to be designed into wonderful new projects!! Purchased a new raspberry blaze color of hand dyed, sock weight yarn by Dream, dreamincoloryarn.com, called “smooshy”. Now who just wouldn’t want a smooshy in their yarn stash. It is a merino wool, cashmere and nylon blend and very, very squishy soft. Haven’t decided what I am going to make with it just yet but I know whatever it is will be scrumptious.
Also, picked up a Malabrigo yarn that will be perfect for a warm winter cowl. And, of course, several new cotton fabrics that will be made into totes and whatever else I might decide to sew.

I hope your New Year starts off with some smooshy yarns and wonderful textiles just waiting to be designed into your something special item. I want to “Thank” everyone who has visited my blog and I look forward to this coming year with new ideas, discussions and designs. If you have something in particular that you want me to talk about, please let me know your questions, thoughts, and/or ideas. Always another way to stir up those creative juices and, hopefully, give insight to new and old techniques.
HAPPY NEW YEAR and HAPPY CREATING!!
Disclaimer: This post contains affiliate links – “small commission earned”
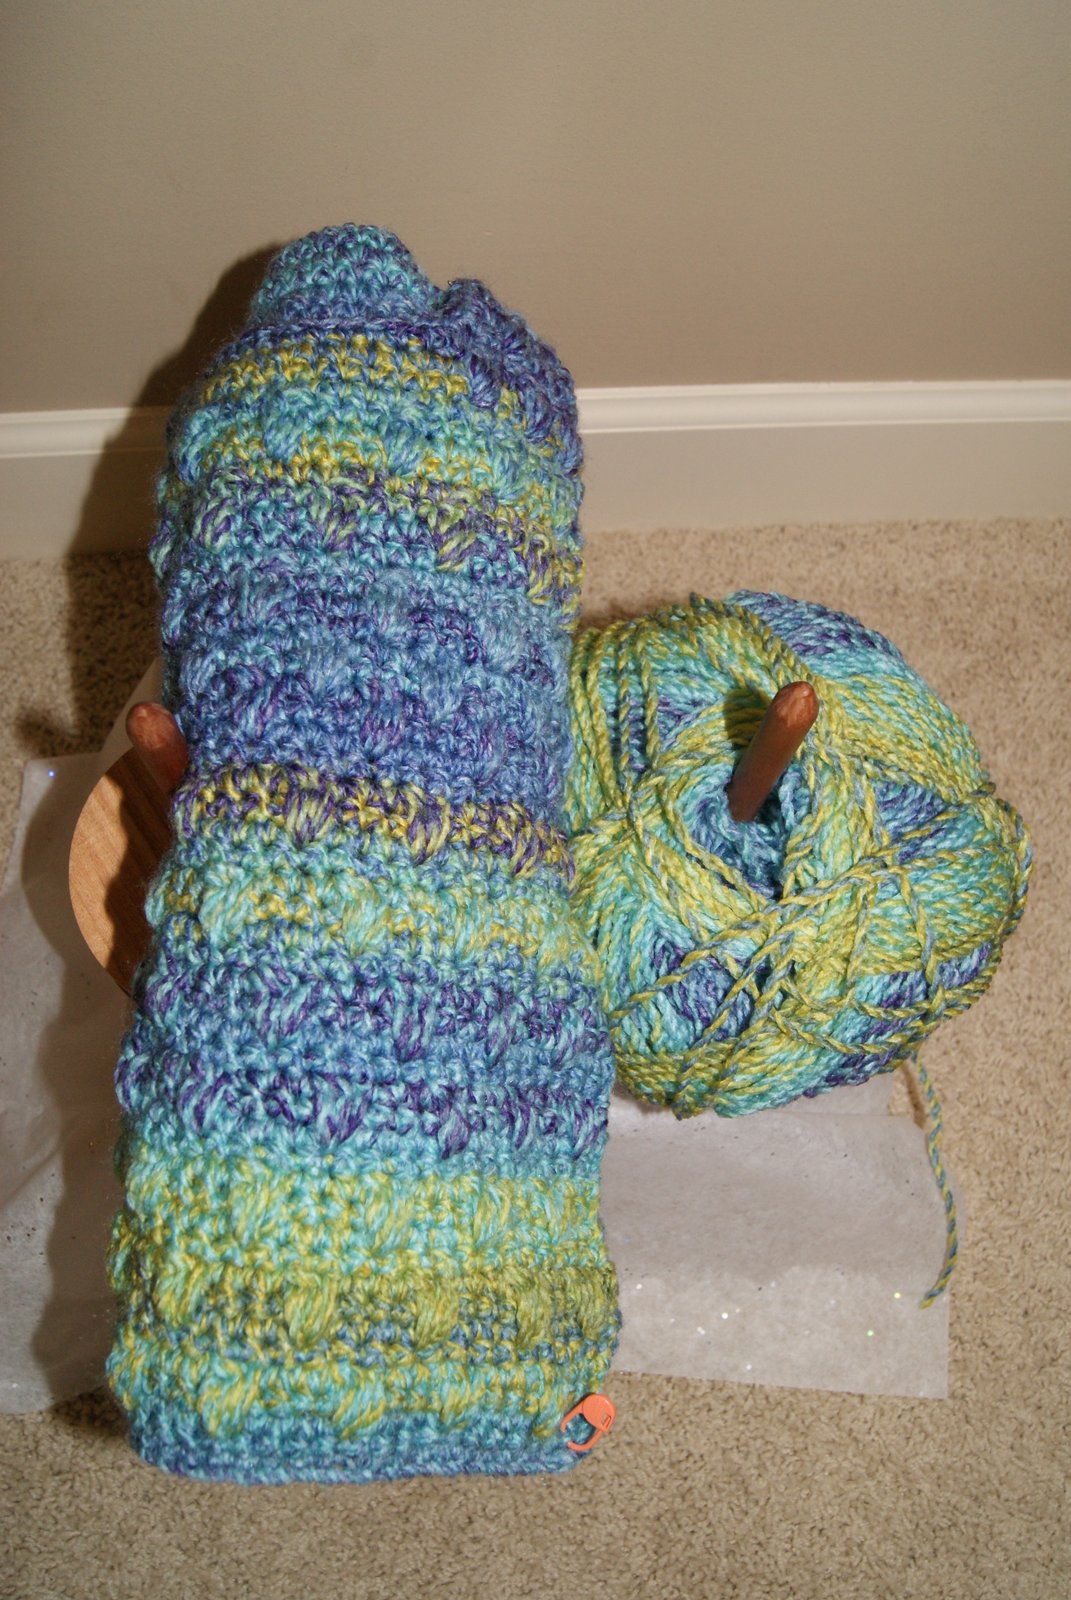
Whether you are crocheting or knitting or doing any type of craft using a skein of yarn, keeping that yarn easily accessible can be a job. Sometimes you feel like you need to “whip it” into shape so you are spending more time crocheting/knitting and less time untangling or retrieving your yarn!! This year I received a Yarn Buddy by Sun Valley Fibers as a Christmas present and boy does it work great!! Basically, as described by SVF, it is a wooden spool lazy susan for your skein of yarn. You don’t need to fuss with locating the center-pull yarn strand anymore. Just slide your skein onto the spool and work using the outer yarn strand. Because the spool is on a turning gear, your yarn spools off either in a clockwise or counter-clockwise direction depending upon how your skein of yarn was wound.
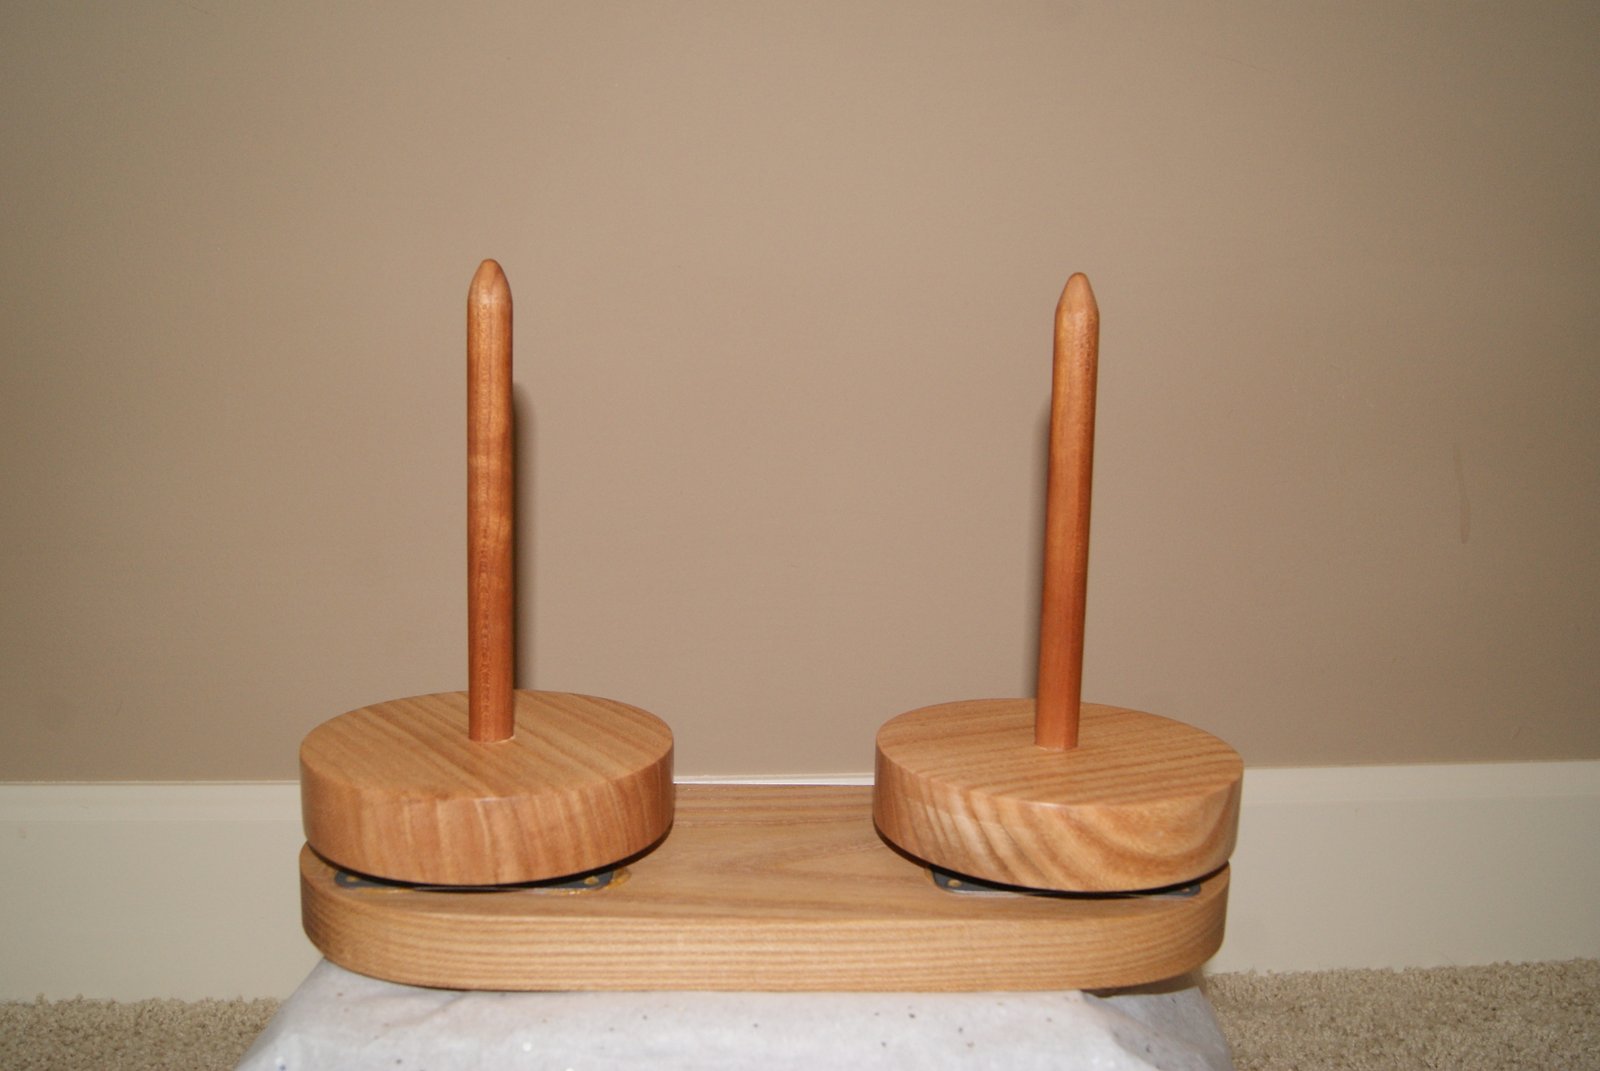
They are made for a single skein of yarn or two skeins of yarn. I was fortunate enough to receive the double spool for two skeins of yarn, which will be perfect for doing a project using two skeins or I can actually have two projects going at the same time. The quality is outstanding, very smooth gear operation and the wood is sanded incredibly smooth!! No varnishes are used either.

The Yarn Buddy is not too large or too heavy and should be easy to take to a class or “knit nite”!! I am actually thinking about taking one of my cloth tote bags, putting a couple of grommets in the center of the bag, placing the Yarn Buddy with yarn down in the bag and then threading my yarn through the grommets. That way my project is ready to travel or to be stored by my easy chair ready at a moments notice. Of course, I have already started a project using the Yarn Buddy and have found that I can even place my completed crochet pattern pieces between the spools so I have them all in one place until I can sew them together. I know this will become one of my favorite items to use for crocheting and knitting projects!!

I did do a little exploring on-line for information on Yarn Buddies. Here is another site I found that looks kind of interesting too, landwoodworks.com, which shows their Yarn Buddy design. This is a super gift item for that special “hooker” in your life or add it to your wish list so that maybe you can receive one as a present too!!
HAPPY CREATING!!
Disclaimer: This post contains affiliate links – “small commission earned”