Disclaimer: This post contains affiliate links – “small commission earned”
Archives
Ups and Downs of Making a Fabric Yo-Yo
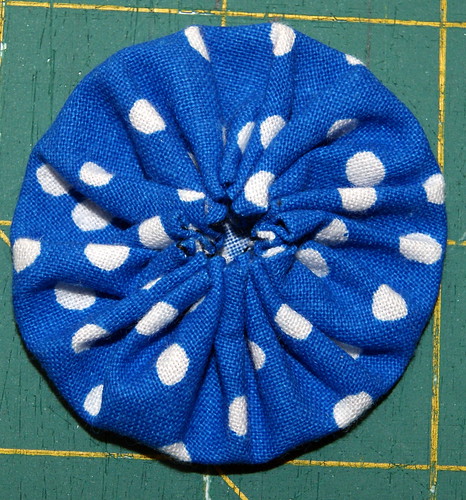
Fabric yo-yos are one of the easiest embellishments to make for your special project. They are also a great way to use up some of those scraps that you have stashed away. Also, they are a fun thing to do with your child to create a new look.
The yo-yo pattern is a basic circle. Your circle pattern needs to be twice as wide as you want your finished yo-yo plus a 1/4″ seam allowance. Once you have determined the size of your yo-yo pattern, draw and cut it out on a piece of heavy stock card paper or use plastic template material found in quilting supplies. Use a compass to make your circle or trace around something you might have on hand, (a drinking glass, a CD, a tin can) or purchase a yo-yo maker or a quilter’s template for circles. Here I used a roll of packing tape!!


Next trace your pattern onto the wrong side of your fabric. Some fabric choices that work best for making yo-yos are cotton, light weight denim, flannel, wool, light weight corduroy, and felt. Remember, you will be gathering up your fabric circle to form the yo-yo, so it is best to use lighter weight materials. Cut out your yo-yo with scissors or a rotary cutter. Remember, if working with a child you might have to do the cutting.
Now you will be folding in your 1/4″ seam allowance onto the wrong side of your fabric with gathering stitches. You can usually just eyeball your 1/4″ seam allowance, however, if you want to insure your seam allowance is consistent, you can sew a line of stitching 1/4″ from edge of circle and then fold in on that stitch line. I like to knot one end of my gathering stitch at the beginning and I strongly recommend using a heavy/strong thread for this step. I have had great success with Dual Duty by Coats and Clark. Also, keep in mind that short gathering stitches will create a larger, more open center on your yo-yo and longer gathering stitches will make tighter center. Something to keep in mind when determining what look you want for your finished yoyo.

To begin the gathering, pull the knotted end of thread out about 3-4″ and continue gathering from the other end until you have it as tight as you want. Once gathered, tie a tight square knot (right over left and then left over right) with your thread for a secure closure. Flatten and smooth out your finished yo-yo. Sew on buttons in the center for flowers, make a smaller yo-yo and sew on top of the larger yo-yo for a dimensional effect, make streamers with yarn or threads to hang from the yo-yo itself, let your imagine run wild.

Yo-yos make wonderful appliques (add fabric stems and leaves for flowers), decorate a headband, use them for pins or pocket accents, or add them to your jeans for a fun look too, the idea list is endless.
HAPPY CREATING!!
Disclaimer: This post contains affiliate links – “small commission earned”
Sewing Knit Cuffs Picture Tutorial
With cooler weather somewhere around the corner, you might be thinking of sewing some pj’s for the little ones or maybe a pair of “comfy” pants to lounge around in the house. Adding ribbed knit cuffs to a pattern or even to an already made piece of clothing is not too difficult.
I particularly like to add them to pajamas to help keep you warmer and I think they are a lot more comfortable than elastic around the wrist or ankle. You can convert any pattern that calls for elastic at the wrist and make yourself a ribbed cuff in its place.
Measure your wrist and/or ankle and add 1″ to that figure. That calculation will be your width measurement when cutting out your ribbed knit fabric. The length measurement is kind of a personal preference thing – I like to have a finished cuff measure 3″ long, so I will cut my length measurement 7″ long. This 7″ allows for my cuff to be folded in half ( 3 1/2″) and then allows for a 1/2″ seam allowance. So whatever your desired finished cuff length is, double that measurement and add 1″ to it for a 1/2″ seam allowance.
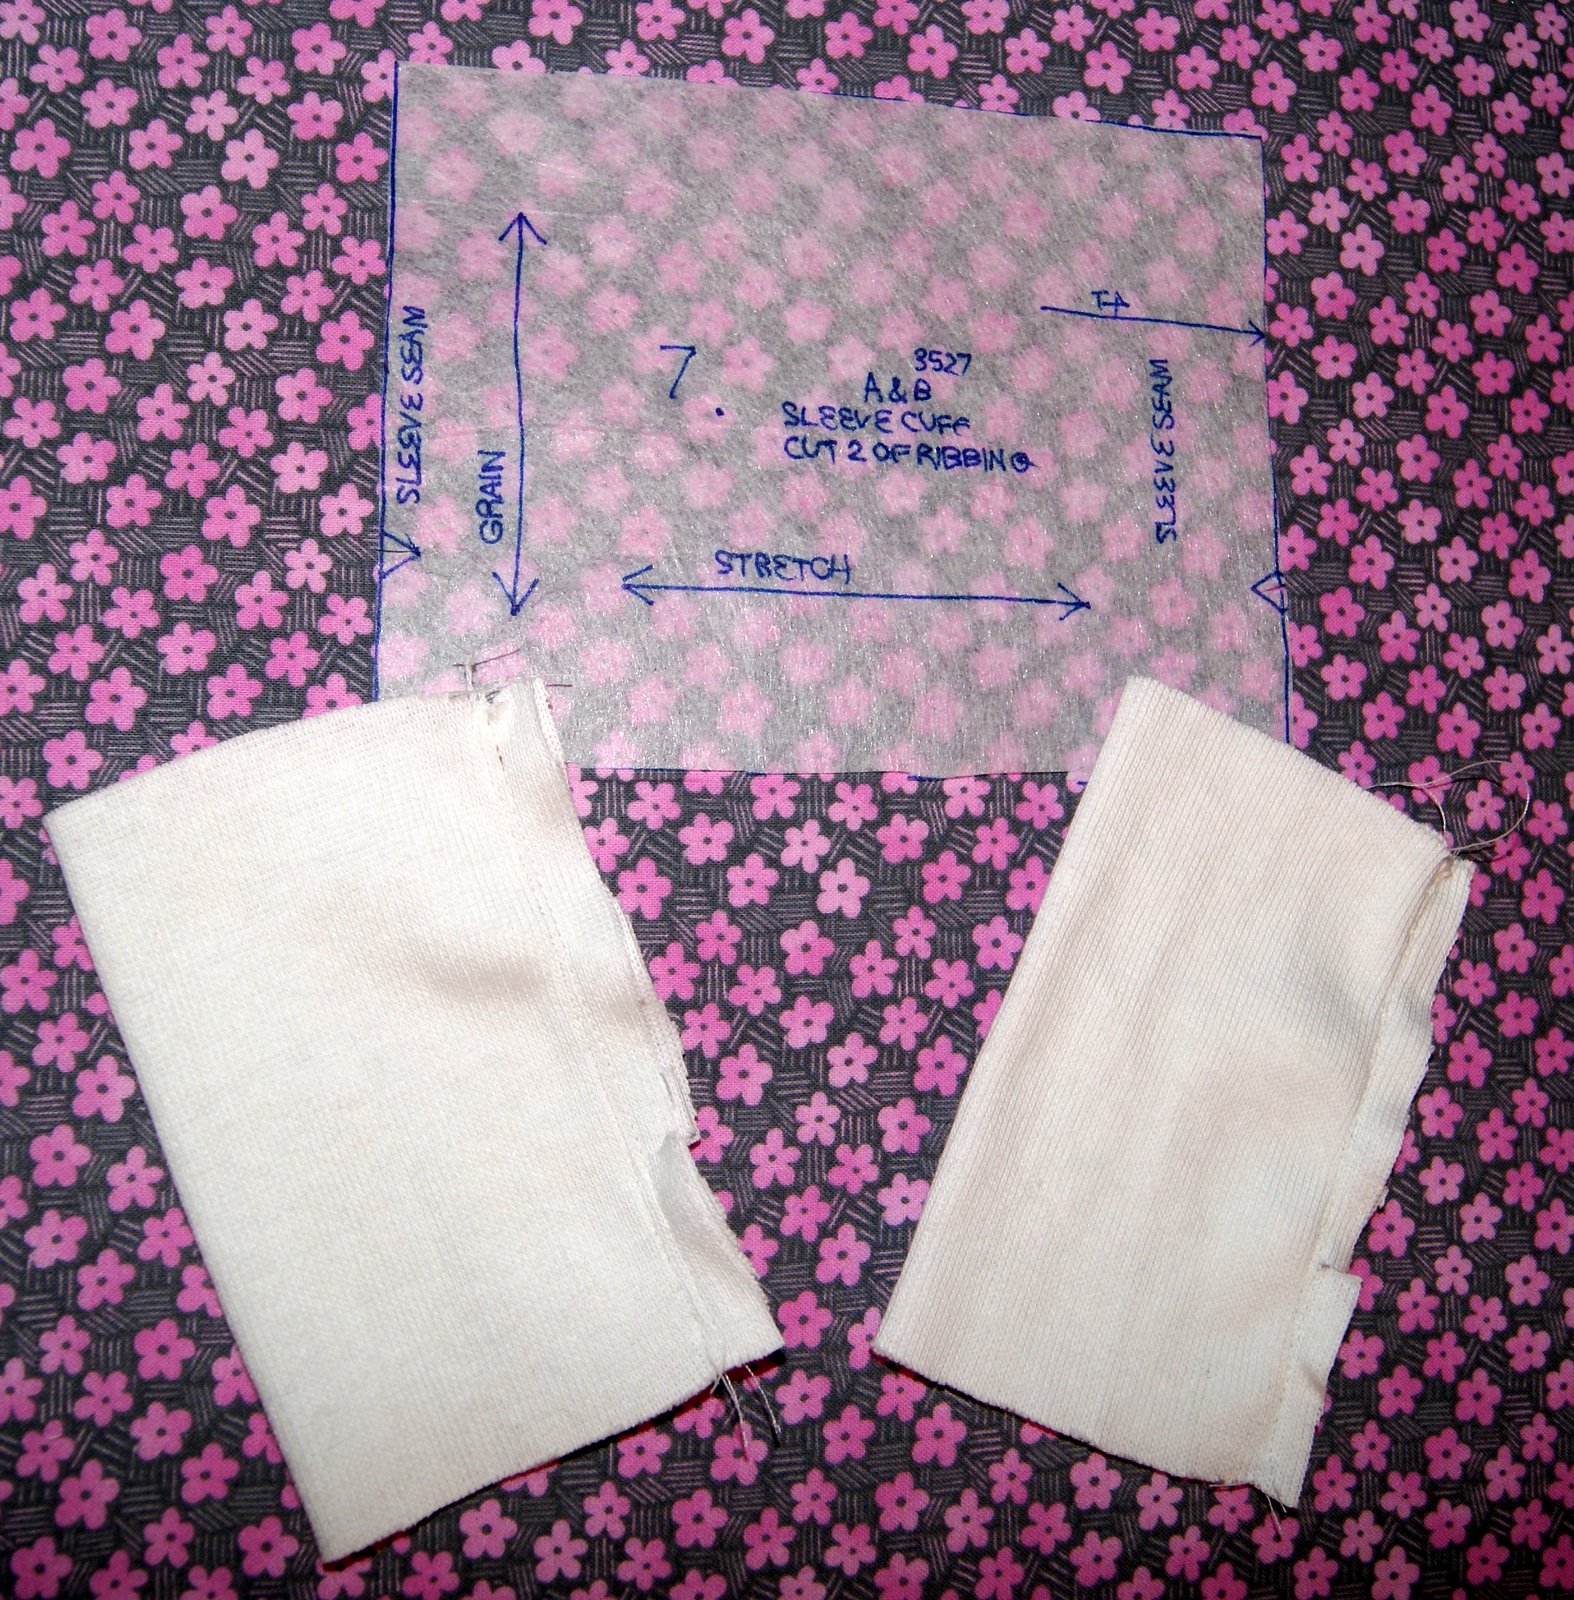
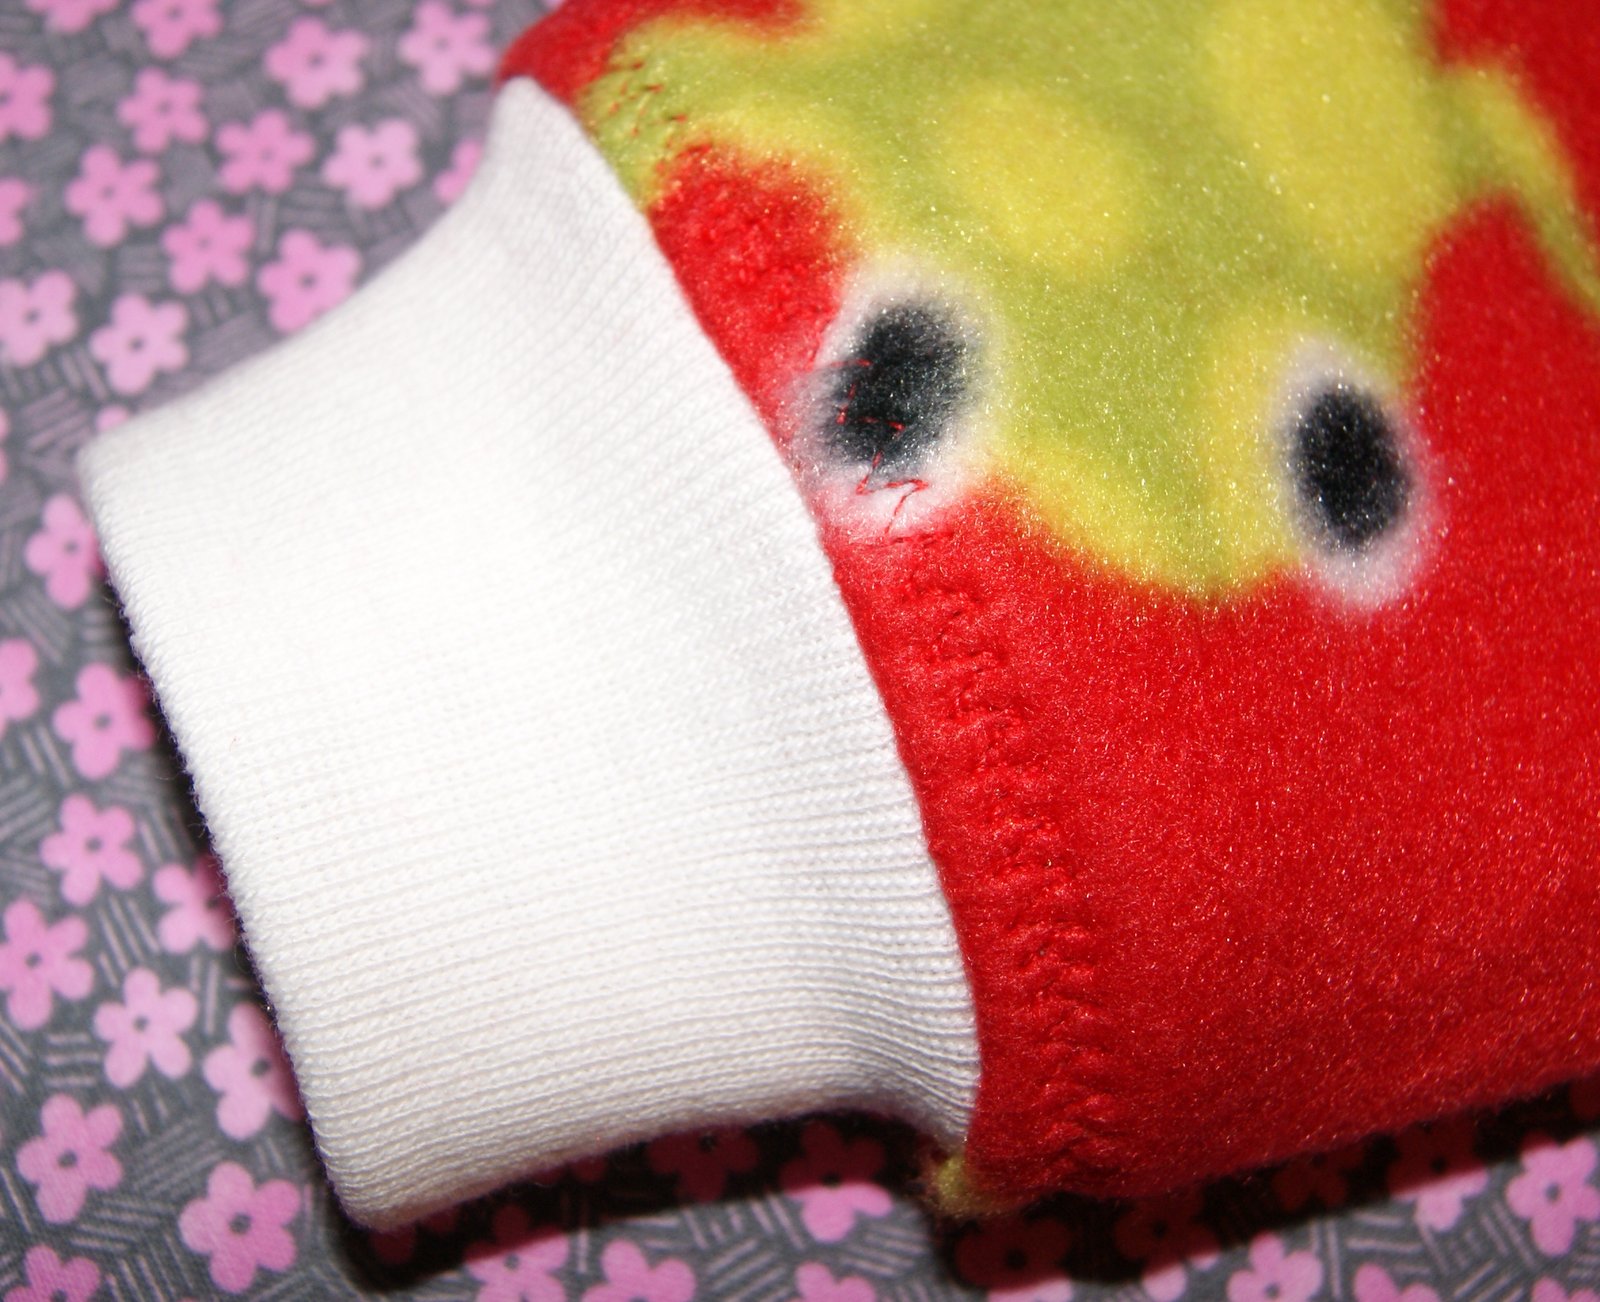
Now that you have your width and length measurements, cut out a paper or pellon pattern to use on the ribbing fabric. You want the fabric ribs to be going vertical on the cuff with the stretchiest part going horizontal which will be placed along the sleeve or pant edge. You will need one fabric pattern piece per sleeve or pant leg and cut out 2 of each.

With right sides together, fold your cuff pattern together with the width end measurements touching. Sew a narrow 1/4″ seam using a stretch stitch. Now serge along that same seam or use a narrow zigzag stitch or overcast stitch if you don’t have a serger. Fold in half, wrong sides together (seam lines matching). You actually have a cuff ready to be sewn to your garment.

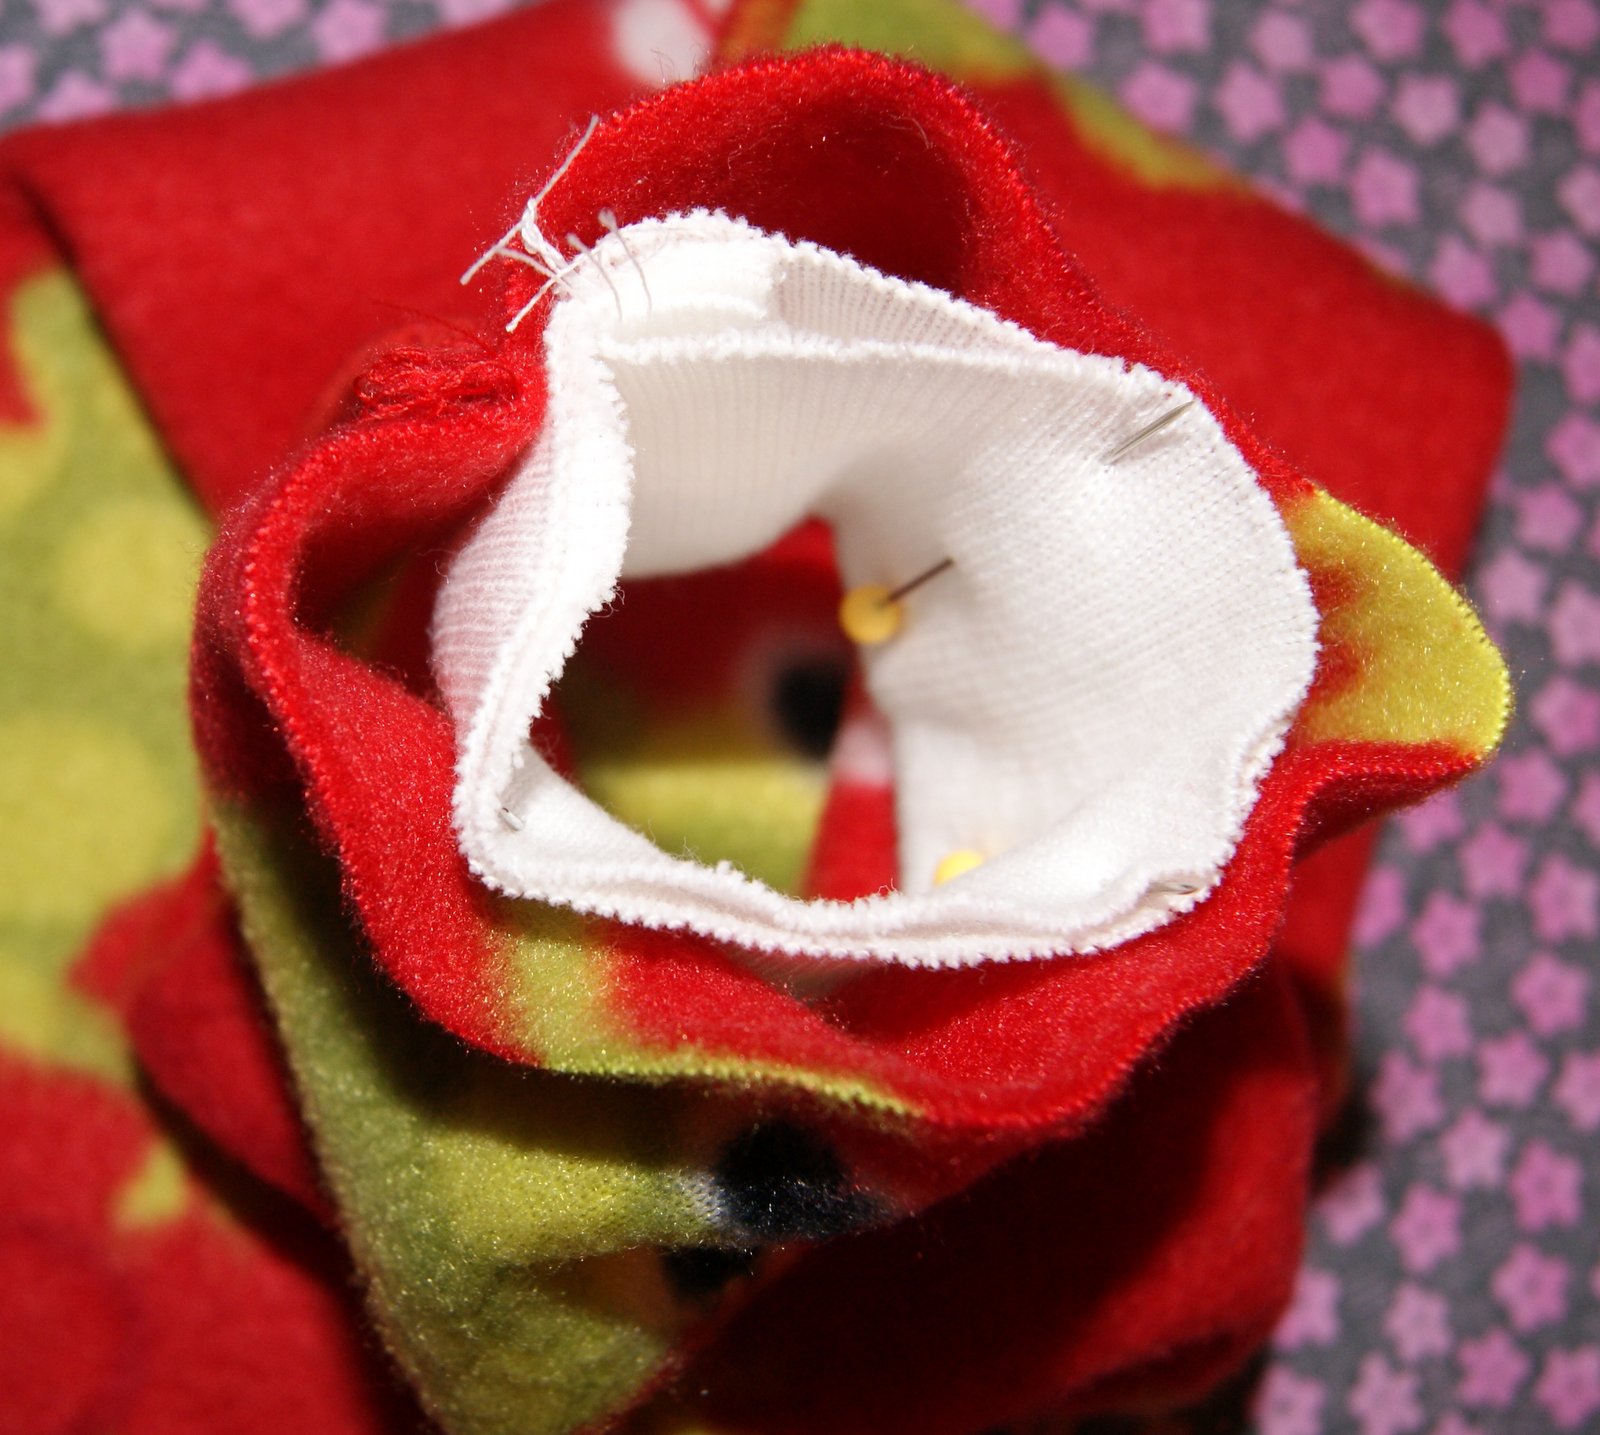
Sew your sleeve or pants together according to your pattern directions, no need for hems or elastic if you are adding the cuffs. To insure your cuff is evenly spaced around, you will want to mark off your sleeve/pant as well as the cuff into fourths. Place a pin at the sleeve/pant seam, place another pin at the opposite side of the sleeve/pant, then find center between those two spots and place two more pins one on the top and one on the bottom of the sleeve/pant. You now have four evenly spaced pin placements to use to match your cuff. You will do the same thing on the cuff, place a pin at the seam, one directly across from it and then find center on top and bottom of cuff. Place right sides together matching your pins. Now you are ready to sew the cuff to your sleeve or pant leg.

Sewing the cuff to the sleeve/pant itself can be a little tricky because you will need to stretch the cuff but not the sleeve/pant fabric. You will keep your sleeve/pant wrong side of fabric against your sewing machine. The right side will be inside and you will place your cuff inside the sleeve/pant garment for stretching the cuff while your sew. Match your pin placements with right sides together.


Beginning at one of the matching pin placements, begin sewing a 1/2″ seam allowance. Stretch the cuff while you sew so that the second pin placement on the cuff matches to the second pin placement on the sleeve and continue around matching all four pin placements with each other and joining stitching line. To give your seam a clean finished look, you can serge the seam or stitch with a narrow zigzag or overcast stitch on the edge.
After you have sewn in your cuff, I like to add a decorative stitching on the outside to help hold the serged seam in place. I sew from the wrong side, holding down the seam and making sure the fabric underneath is smooth and flat.

Turn your sleeve right side out and you now have a wonderful cuff attached that will keep cool air out and help sleeve to stay in its place and not fall down over your hand. I like to add cuffs to pant bottoms too for the same reasons. If sewing for a child, you can add a little extra length to your pant pattern to allow for growth and the cuff will help to keep that extra length from dragging on the floor.
HAPPY CREATING!!
Disclaimer: This post contains affiliate links – “small commission earned”
Tips for making Children’s Shorts
Making elastic waisted shorts for children is really easy, quick and fun!! You can actually get a pair of size 5 shorts out of a half of yard of cotton fabric and if you find some cute fabric among the remnants, WOW.
Prewash your cotton fabric to allow for any shrinkage and cut out your short pattern, (2) fronts and (2) backs and be sure to make clip cuts to mark your notches. At this point too, I always place a pin in one of the back short fabric pieces because I serge all my seams and will serge off the notch placements. It is important to ensure that you don’t accidentally sew a front piece to a back piece at the center seam. The fronts will always only have one notch (maybe two) and the backs will always have two notches (maybe three). Anyways, all patterns are notched with less notches for the fronts and more notches for the backs. 
Now you want to begin sewing your shorts by first placing one front piece to one back piece, right sides together and only sew the inner leg seam. You will do that same sewing for the other front and back piece. I like to then serge both of those seams for a clean edge. If you don’t have a serger, you can just press open your seams.
Next you will want to pin the right sides together matching both front pieces to each other and both back pieces to each other. You will want to sew that seam twice. I make my first seam at the usual 5/8″ from the edge and come back and stitch again about 1/2″ from the edge. Just extra stitching support for a well used seam. I now serge that seam too or you can again just press open as far down as possible.


Now you will want to sew the side seams together. Matching front and back side seams on both sides (right sides together) stitch your 5/8″ seam and then serge or again press your seams open. At this point, I like to serge the edge of the shorts where the hem will be and serge along the top/waist which will be folded over for the elastic. If you don’t have a serger, a close zigzag stitch will work too.


At this point, I will machine stitch the bottom hem for both legs. I sew a 5/8″ stitching line from the bottom edge of the short leg, either on the right side or wrong side of the fabric. This stitching will be used to mark the hem. I then take the shorts to the ironing board and press that hem up along the stitching line making sure the stitching itself folds over to the wrong side. Press all the way around the leg opening, no pins needed. Now go back to the sewing machine and stitch the hem in place. This is a great time to use some of your decorative stitches or sew two lines of straight stitches about 1/4″ apart for a nice finished look for the hem.


Last step is to make the waist band. Fold over a 1 1/2″ hem along the top and press into place and use about 4 pins to hold it there. I use a piece of cotton twill tape and write the size info with a black permanent marker and place it at the center back seam. Stitch your waist band, folding under the serged edge as you go and leave about a 2″ opening for elastic. Cut your elastic 1″ smaller than the waist size, insert into opening and overlap it about 1/2″ on each side and zigzag in place at both raw edges. You want the elastic to stretch a little when wearing so it doesn’t slide down. Adjust your gathers so they are evenly spaced. To keep the gathers from shifting, I sew a stitching line (stitching in the ditch) along all four seams lines around the shorts.


You will find that you can make a pair of shorts in about 45 minutes. Stack a couple of fabrics on top of each other and rotary cut them out so you have about 3 pairs ready to be stitched. These are the same directions that I use if making a pair of gathered waist pants or capris for little ones. Actually, this is a great sewing project for a young person to make for themselves with adult supervision to keep Stitching4Ever alive!
HAPPY CREATING!!
Disclaimer: This post contains affiliate links – “small commission earned”
Installing those cute Magnetic Clasps
Aren’t those little magnetic clasps wonderful for totes, purses and other handmade projects. However, they never seem to come with directions on how to put them in place.
I have used them many times for various projects and find they work just great and I love using them. If you have never used them before, they come as a set with one thin pronged piece, one thicker pronged piece and two thin circles which are actually your back supports or washers.

One set of a magnetic clasp
You first need to determine exactly where you want the clasp to be placed. If you are following a pattern, there is probably a placement mark for you to use. However, if you are designing your own project, I have found that installing the center of the clasp 1 1/4″ from the bottom unfinished edge leaves room enough for a 1/2″ seam allowance using your regular presser foot on your sewing machine and keeps the clasp close to the finished edge.
Also, using the thinner clasp on the front of your bag/project and the larger, thicker clasp on the back portion makes the opening and closing motion work smoothly.
Now with all that said, I mark the center of the front piece 1 1/4″ from the bottom and place the thin round circle at that point. Take a sharp pencil and make a small dot in the center and draw two small lines inside the rectangle cutouts. These are placement markings and will be covered up after you have installed the clasp.

How I make my registration markings

My markings for pellon and clasp placement
Next, I take a pin and insert it on the front of my material pinning it from line to line. Flip my fabric over and draw a pencil line along the pinned area. This is only for a marking reference for me to make sure that I iron on my supporting pellon in the proper place.
I do like to use two layers of a medium weight, fusible pellon to give extra support behind the clasp because that clasp takes a lot of abuse from opening and closing. I cut out my pellon roughly in 1″ squares. Basically, I eyeball my cut size but I want it big enough to support the clasp and washer. It is a great way to use up some very small scraps that would otherwise be tossed!!
After making all my pencil marks as stated above, I now will iron the pellon onto the wrong side of my fabric. Iron one piece of pellon on top of the other piece according to your fusible directions.
Now here’s a great use for that seam ripper other than removing stitches. I stick the seam ripper through the fabric and pellon and slide it down very carefully following my pencil lines, which are only about 1/8″ long. Do that again on the other pencil line. Take the thin clasp with the prongs and push the prongs through the openings you just made. Turn it over and place the back support circle onto the prongs and fold over those prongs. Finding the proper tool to do this job was somewhat challenging but I keep a small, wooden 6″ ruler in my sewing accessory box and it is the perfect tool to push those prongs over without hurting your thumbs!! Just place the ruler against one prong and push down and then place it against the other prong and push down. Then I put the ruler over both closed prongs and give it one more push. Viola, you have the front clasp done.

Slice along the two vertical pencil lines to make opening for prongs
Now you need to do the same thing for the back using the thick clasp with prongs. The trick is getting them lined up perfectly. If you take your front piece that already has the clasp installed and lay it on top of the back that it will be attaching to and press firmly, you will have a small indentation from the front clasp and that will be your registration point. Within that indented circle, place a small pencil dot and center your thin circle back support over your dot and make your markings again. Proceed installing the back clasp just like you did for the front clasp.

Completed thinner front clasp

The thicker back closure
Now you have yourself a lovely little magnetic clasp closure that is great for many different projects. Be creative and dream up some clever uses for them.
HAPPY CREATING!!
Disclaimer: This post contains affiliate links – “small commission earned”